
Your creative workspace

CHOOSE YOUR OUTPUT

Six tools. A layout for each project.
Your source image can follow you between tools in this tab.

THE BEAD WORKSHOP

Kandi Pattern Maker

Design a kandi pattern on an editable bead grid,
choose colors, and print the layout with bead counts.

SHIFTED ROWS / COLOR PLACEMENT

Edit a bead

Click or tap one bead at a time. On the focused chart, arrow keys move; Enter or Space paints; Delete erases. Coordinates provide the same controls.

03

Your color plan, ready to print.

Letter key, bead counts and shifted rows

0 beads0 colors used

Preparing your example…

Making a fuse-bead design? Open the Perler tool →

Physical validation by an experienced beader is pending. This is a flat color-placement chart, not a cuff joining or threading tutorial.

FROM AN IDEA TO INDIVIDUAL BEADS

Create a Kandi Pattern

Begin with a picture.
Or draw from a blank grid.

Original Ripple artwork with green, sage and orange zigzag bands
Ripple · original vector artwork for this tool.
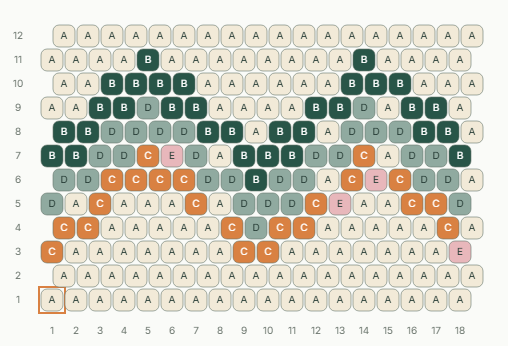
The printable example below comes from the actual conversion.

A kandi pattern generator you can edit

Start with an empty bead grid to draw a small motif, or turn an image into a kandi pattern using PNG, JPG or WebP. The converter samples your image at the shifted bead positions and maps each position to the nearest of eight palette colors. Transparent areas use color A as the background.

Simple silhouettes and bold bands are easier to read at bead scale than fine photo detail. Set the dimensions and image fit first, then adjust individual beads. A blank grid contains no beads until you paint them; an image conversion fills every position, including the background.

Make your first bead chart ↑

ONE DEFINED STITCH LAYOUT

Choose the Supported Bead Layout

Half a bead to the side.
Keep the geometry when printing.

Flat brick stitch, with staggered rows

This version supports a flat brick-stitch color chart. Row 1 sits at the bottom; even-numbered rows shift half a bead to the right. Each row has the selected number of positions, so the outside edges alternate. Column numbers identify positions within a row, not vertical stacks of beads.

Brick stitch connects beads to the thread bridges of the preceding row, commonly starting from a ladder-stitch foundation. The chart records color placement; it does not generate that foundation, a thread path, increases, decreases or a closure.

It does not support tubular peyote, multi-stitch cuffs, loom layouts or wrist sizing. Bead shape and tension affect the finished proportions. Make a small physical sample before scaling up.

The Beadworkers Guild: brick-stitch method ↗

SMALL EDITS, CLEAR TOTALS

Edit Colors and Count Beads

One letter per palette color.
Counts follow your edits.

Paint or erase individual beads

Select a palette letter, then click a bead to paint it. Choose Erase bead to remove a position, or use the coordinate controls. Keyboard users can move with arrow keys and paint with Enter. Erased positions are empty, not white beads.
Recolor a whole group

Change a palette color to recolor all beads with that letter. Up to eight color groups keep the chart readable. These are editable screen colors, not a matched shopping list. Compare them with the actual beads you have.

Check counts before printing

The palette shows each letter’s bead count; the total excludes erased positions. Undo and Redo retain 30 editing actions, including color changes. Changing dimensions, image fit or source starts a new chart and clears that history.

Keep the structure in mind

Erasing beads can create unsupported holes or disconnected areas. The editor does not validate a continuous thread path or prescribe shaping. For a continuous panel, paint a background color instead of erasing it.