Pixel art / GUIDE
Butterfly Pixel Art: 8 Wing Shapes to Copy and Color
Explore eight butterfly outlines, including pointed tips, long tails and a folded side view. Follow four drawing panels and save the PNGs or labeled paper charts.
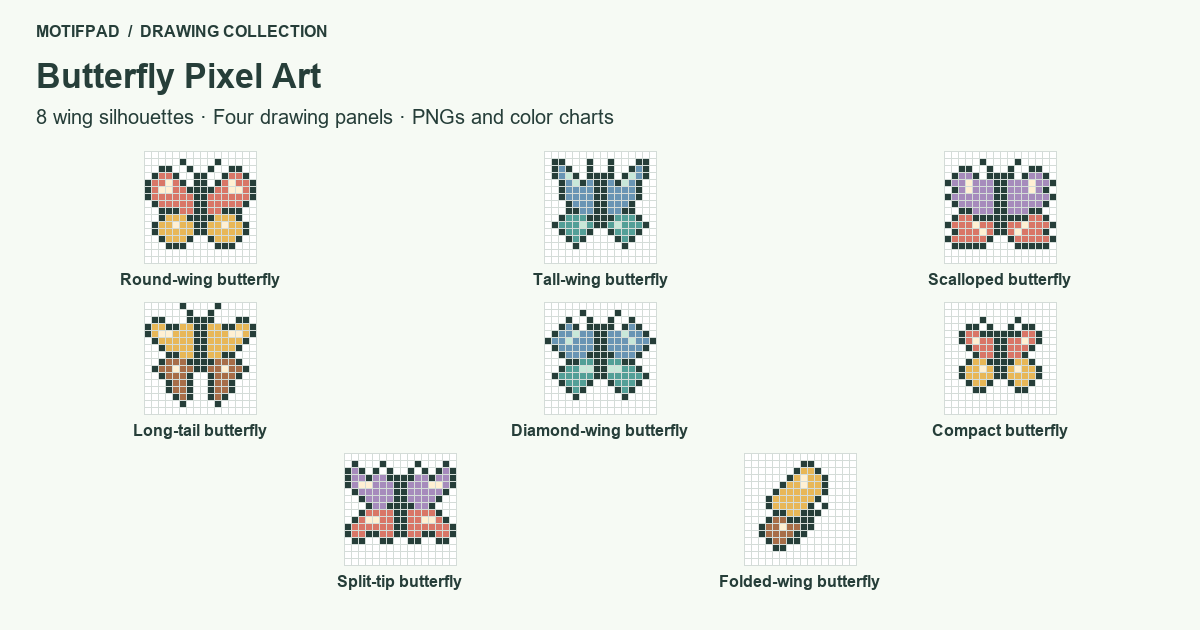
Butterfly pixel art can change character with one notch in a wing or a longer lower tail. These eight drawings explore rounded, pointed, scalloped and folded silhouettes on 16 × 16 grids. Use the four drawing panels to build each one, then save its transparent PNG or copy the lettered chart onto a practice sheet.
Choose a wing outline to practice
The compact design is a good place to begin with easy butterfly pixel art: it has four small highlight cells and generous blank margins. The split-tip and long-tail designs need closer attention to their empty notches. Seven drawings mirror across the center; the folded-wing view is deliberately asymmetrical.
| Butterfly | Grid | Colors | Wing feature |
|---|---|---|---|
| Round-wing butterfly | 16 × 16 | 4 | Broad upper wings above two rounded lower lobes |
| Tall-wing butterfly | 16 × 16 | 4 | Tall upper tips and small lower triangles |
| Scalloped butterfly | 16 × 16 | 4 | Stepped wing edges with alternating outward points |
| Long-tail butterfly | 16 × 16 | 4 | Two long lower tails below a wide upper pair |
| Diamond-wing butterfly | 16 × 16 | 4 | Angular points with diagonal light marks |
| Compact butterfly | 16 × 16 | 4 | A small silhouette with generous outside margins |
| Split-tip butterfly | 16 × 16 | 4 | Indented upper tips and forked lower edges |
| Folded-wing butterfly | 16 × 16 | 4 | A side silhouette with only one visible wing pair |
Count from the center without losing the grid
Read each butterfly pixel art grid using the numbered columns above it and rows along its left side. The front-facing drawings mirror between columns 8 and 9. Match the distance of each colored cell from that center line, then compare the blank spaces outside both wings.
Panel 2 contains the dark outline and body. Panel 3 separates the main wing colors, while panel 4 adds the light marks. In a drawing app, use a one-pixel pencil on a 16 × 16 canvas. On paper, color entire squares and leave the unoccupied ones clear.
Eight butterflies with different wing shapes
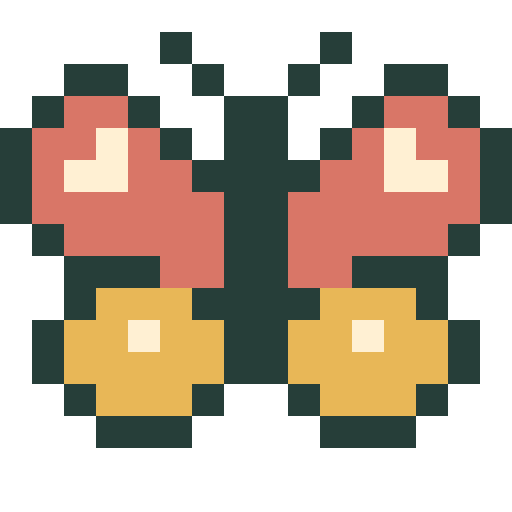
1. Round-wing butterfly
16 × 16 pixels · 4 colors. K = ink (#263E39); A = coral (#D97667); B = gold (#E8B757); C = cream (#FFF0D3).
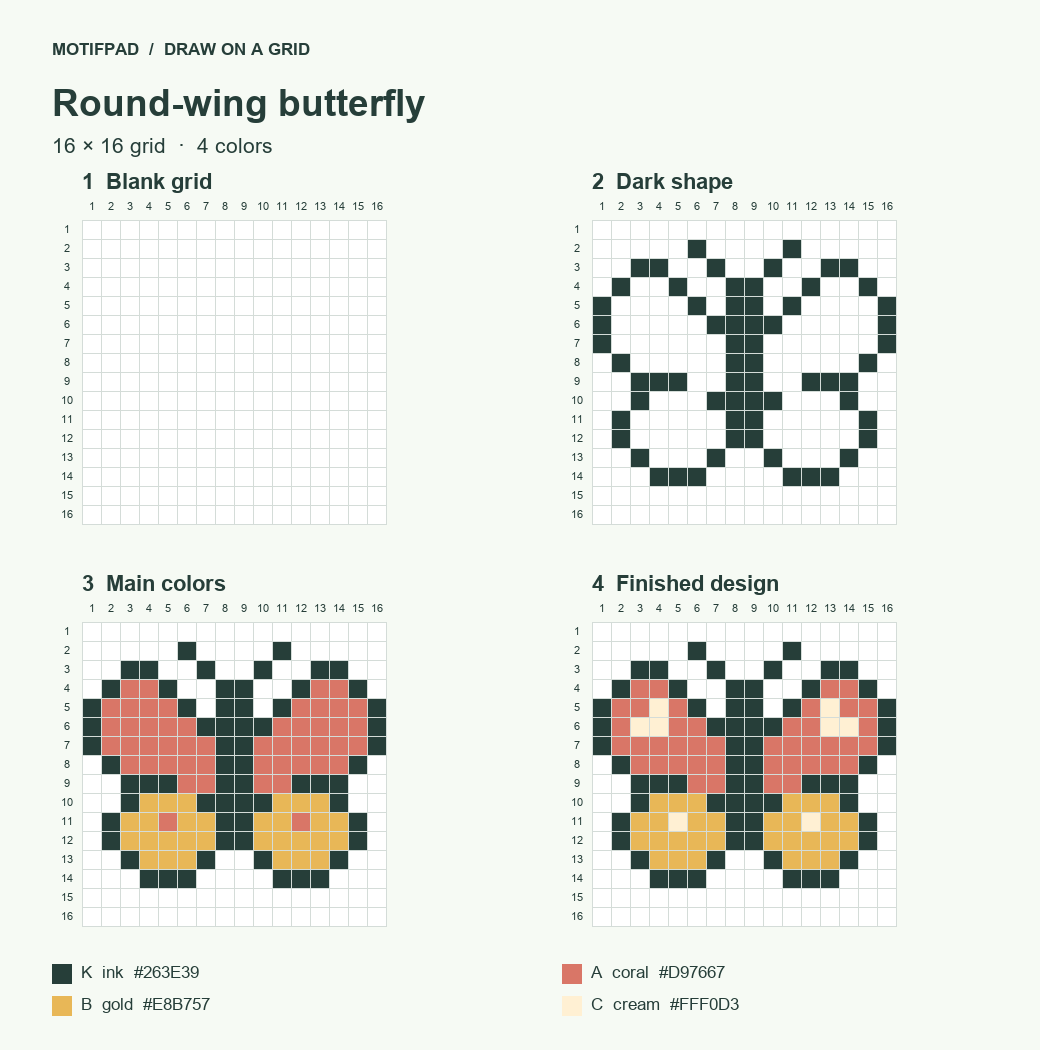
- Draw the dark center and antennae, then outline the broad upper wings. Copy one side row by row and reflect it across the two-cell body. Close the small lower lobes without filling the notches beside them.
- Fill the upper wings with coral and the lower lobes with gold. Keep the short dark dividing lines between the two wing areas. The white corners outside the outline remain background.
- Place the cream marks in both wings. Each upper mark has three cells, while each lower lobe has one. Match their distance from the body so the finished butterfly stays symmetrical.
2. Tall-wing butterfly
16 × 16 pixels · 4 colors. K = ink (#263E39); A = blue (#6995B4); B = teal (#539F97); C = mint (#C8E8D9).
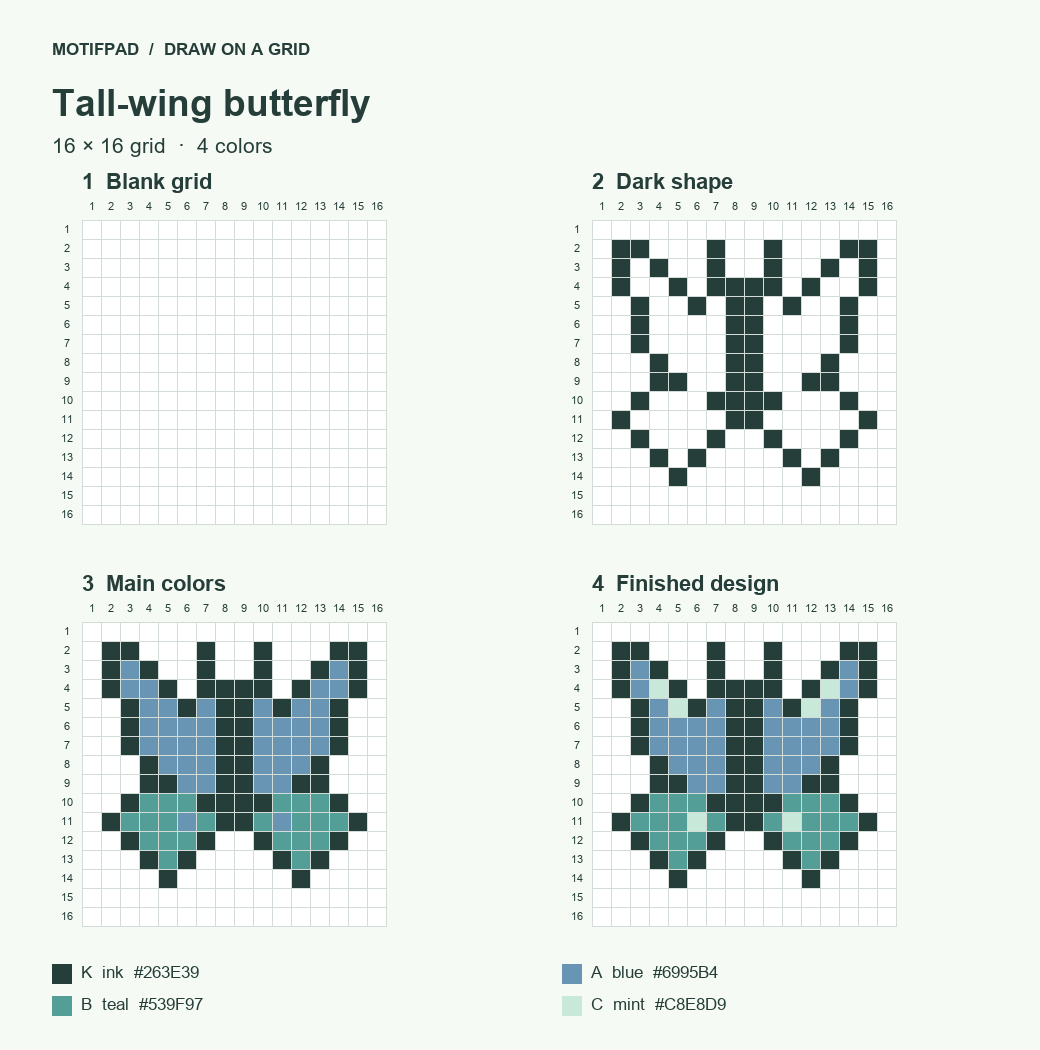
- Place the narrow upper tips first, then step the outlines inward toward the body. Keep the dark antennae separate from the upper wing edges where the blank cells divide them. Add the small lower triangles last.
- Fill the tall wings blue and the lower wings teal. Follow the diagonal edge rather than making the upper section rectangular. The lower tips should occupy much less space than the upper tips.
- Add the two-cell mint streak to each tall wing and one mint cell to each lower wing. Keep the streaks along the diagonal. These six light cells emphasize the upward stretch.
3. Scalloped butterfly
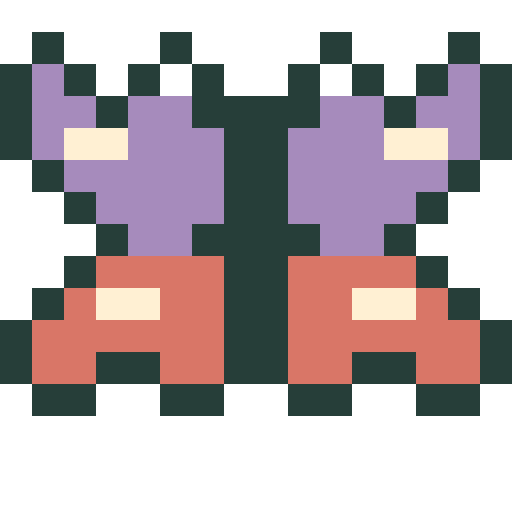
16 × 16 pixels · 4 colors. K = ink (#263E39); A = lavender (#A68BBC); B = coral (#D97667); C = cream (#FFF0D3).
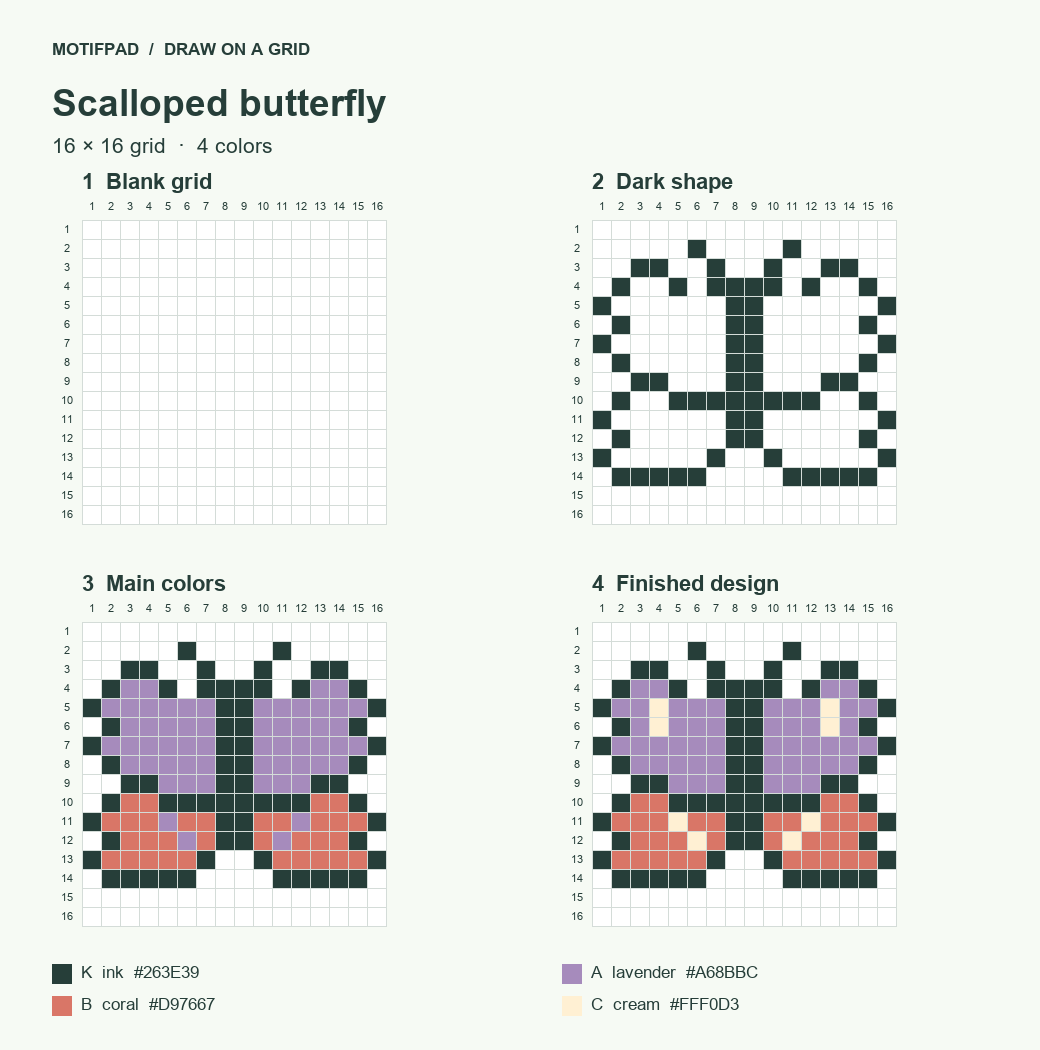
- Trace the upper wings with the small outward and inward steps intact. Repeat that scalloped rhythm on the lower edges. Do not connect the outermost points with a straight vertical border; the small gaps create the shape.
- Use lavender for the upper sections and coral for the lower sections. Preserve the dark band where the colors meet. Fill only the enclosed cells, leaving each notch along the edge empty.
- Add cream in short two-cell marks on each wing section. The upper marks are vertical; the lower marks step diagonally. Check those directions against the final panel before repeating them on the opposite side.
4. Long-tail butterfly
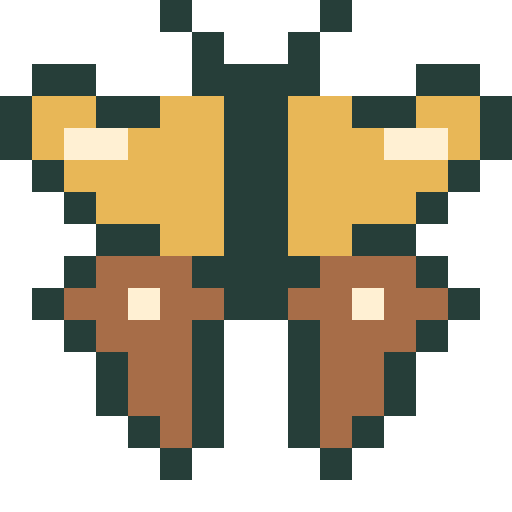
16 × 16 pixels · 4 colors. K = ink (#263E39); A = gold (#E8B757); B = chestnut (#A76D48); C = cream (#FFF0D3).
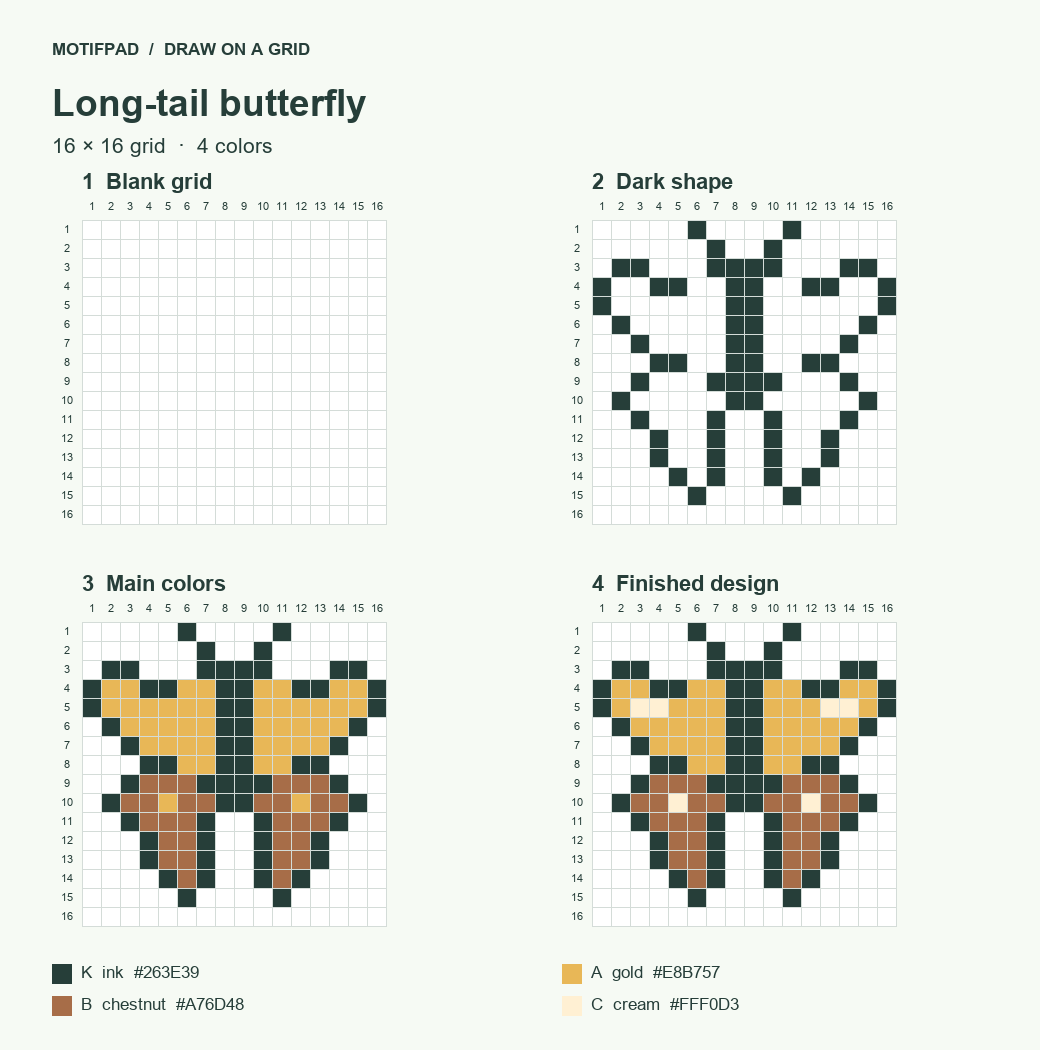
- Outline the broad upper pair, then continue the lower wings down into their long tails. Follow the stepped inner edges near the body. Keep the empty strip between the tails visible all the way to their ends.
- Fill the upper wings gold and the lower wings chestnut. The brown area extends down each tail. Leave the dark upper-to-lower boundary intact rather than letting the two fills merge.
- Place two cream cells in each gold wing and one in each brown lobe. Keep the narrow tails plain. The pale marks sit near the broader parts of the wings, where they remain readable.
5. Diamond-wing butterfly
16 × 16 pixels · 4 colors. K = ink (#263E39); A = blue (#6995B4); B = teal (#539F97); C = mint (#C8E8D9).
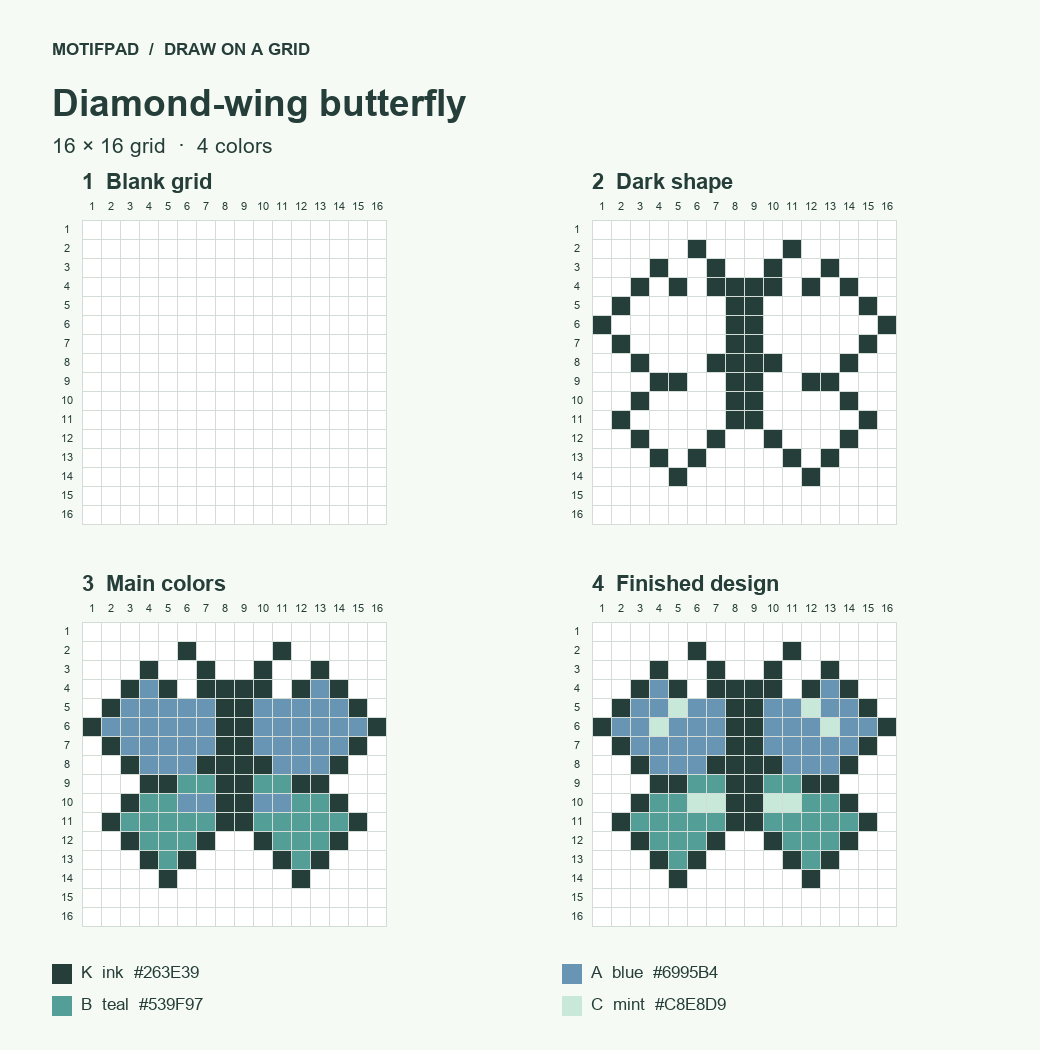
- Build each upper wing outward to a single wide point, then taper it back toward the body. Copy the lower wing as a smaller diamond. Keep the dark center straight while the outside edges change width.
- Fill the upper diamonds blue and the lower ones teal. Work across each row from the center outward so the diagonal boundaries remain aligned. Do not round the pointed tips with extra cells.
- Add two mint cells diagonally inside each upper wing and two together inside each lower wing. Keep the lower marks near the center. Compare the two pointed outer tips before adding a background.
6. Compact butterfly
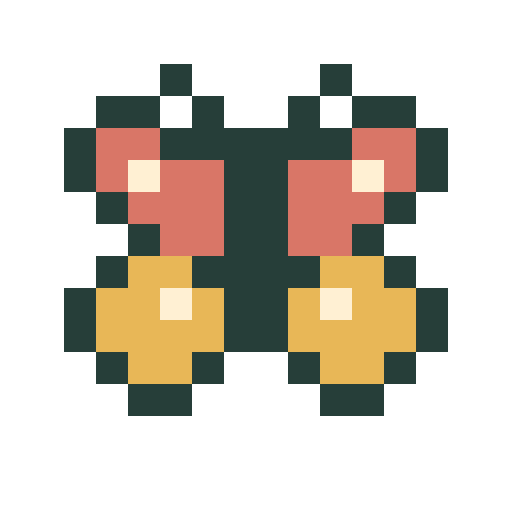
16 × 16 pixels · 4 colors. K = ink (#263E39); A = coral (#D97667); B = gold (#E8B757); C = cream (#FFF0D3).
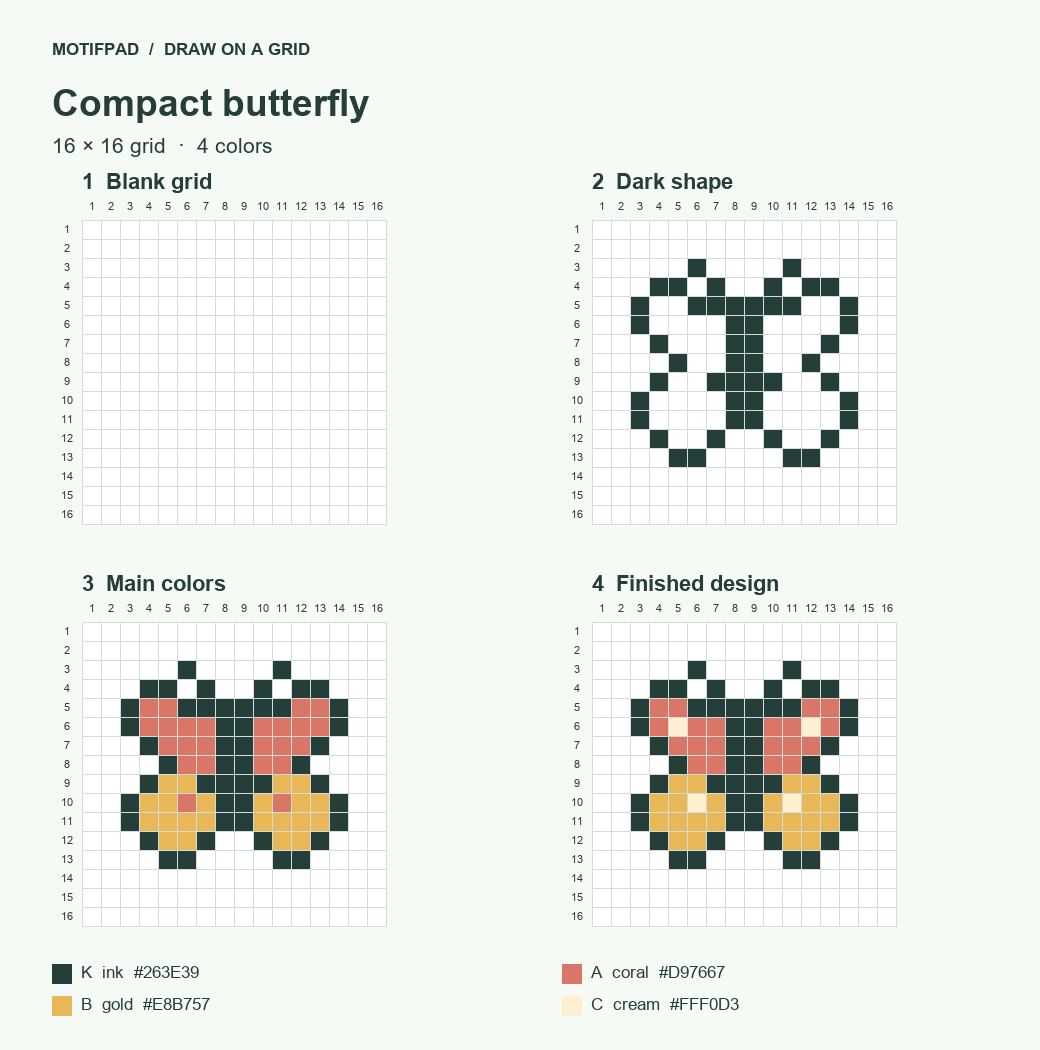
- Keep the compact wings near the middle of the grid. Draw the upper outlines beside the antennae, then add the small lower lobes. Leave the extra rows above and below the butterfly empty instead of stretching it to the canvas edge.
- Fill the upper wings coral and the lower wings gold. Preserve the small dark turn where each wing narrows toward the body. That turn separates the two sections despite their small size.
- Add one cream cell to each of the four wing sections. Count four light cells in total. Their small size gives this drawing a simpler pattern than the larger butterflies.
7. Split-tip butterfly
16 × 16 pixels · 4 colors. K = ink (#263E39); A = lavender (#A68BBC); B = coral (#D97667); C = cream (#FFF0D3).
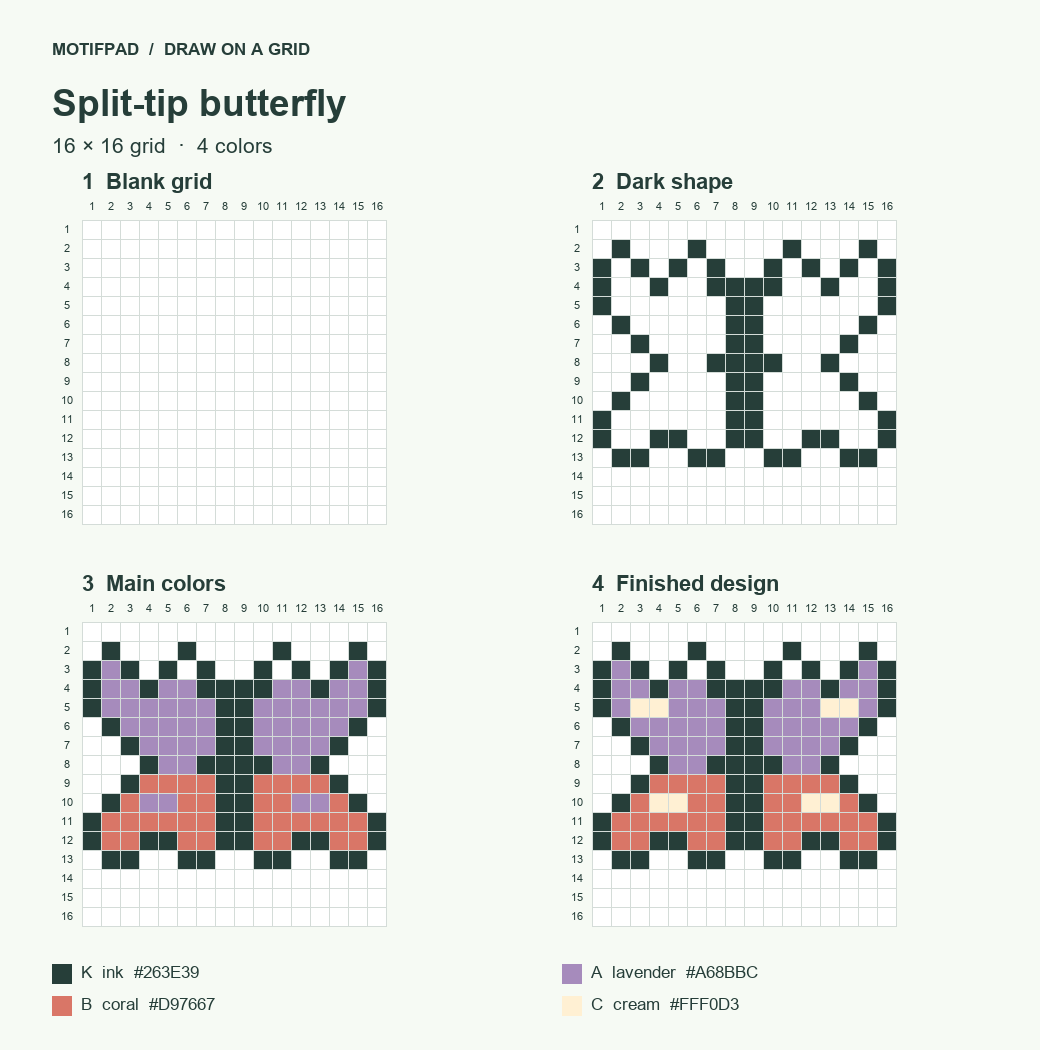
- Copy the small notch inside each upper tip, then outline the forked bottom edges. Keep the lower notches empty. These indentations are part of the silhouette, so adding background-colored pixels inside them would change the transparent PNG.
- Fill the upper wings lavender and the lower wings coral. Work around the dark forks at the bottom. The two colors meet near the body without covering the dark dividing cells.
- Add paired cream marks in the broad part of each wing. Keep the marks away from the split tips. Match the blank lower notches on both sides before finishing the opposite wing.
8. Folded-wing butterfly
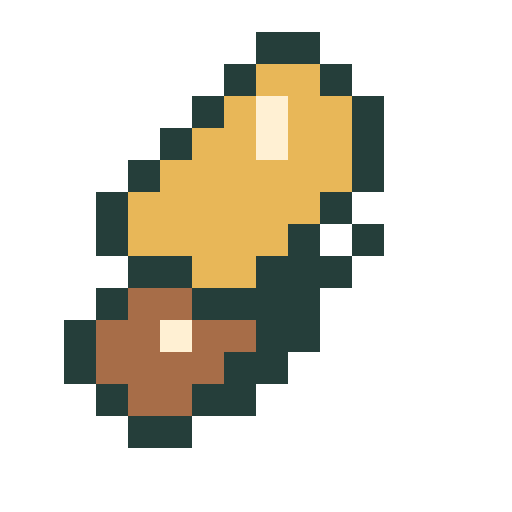
16 × 16 pixels · 4 colors. K = ink (#263E39); A = gold (#E8B757); B = chestnut (#A76D48); C = cream (#FFF0D3).
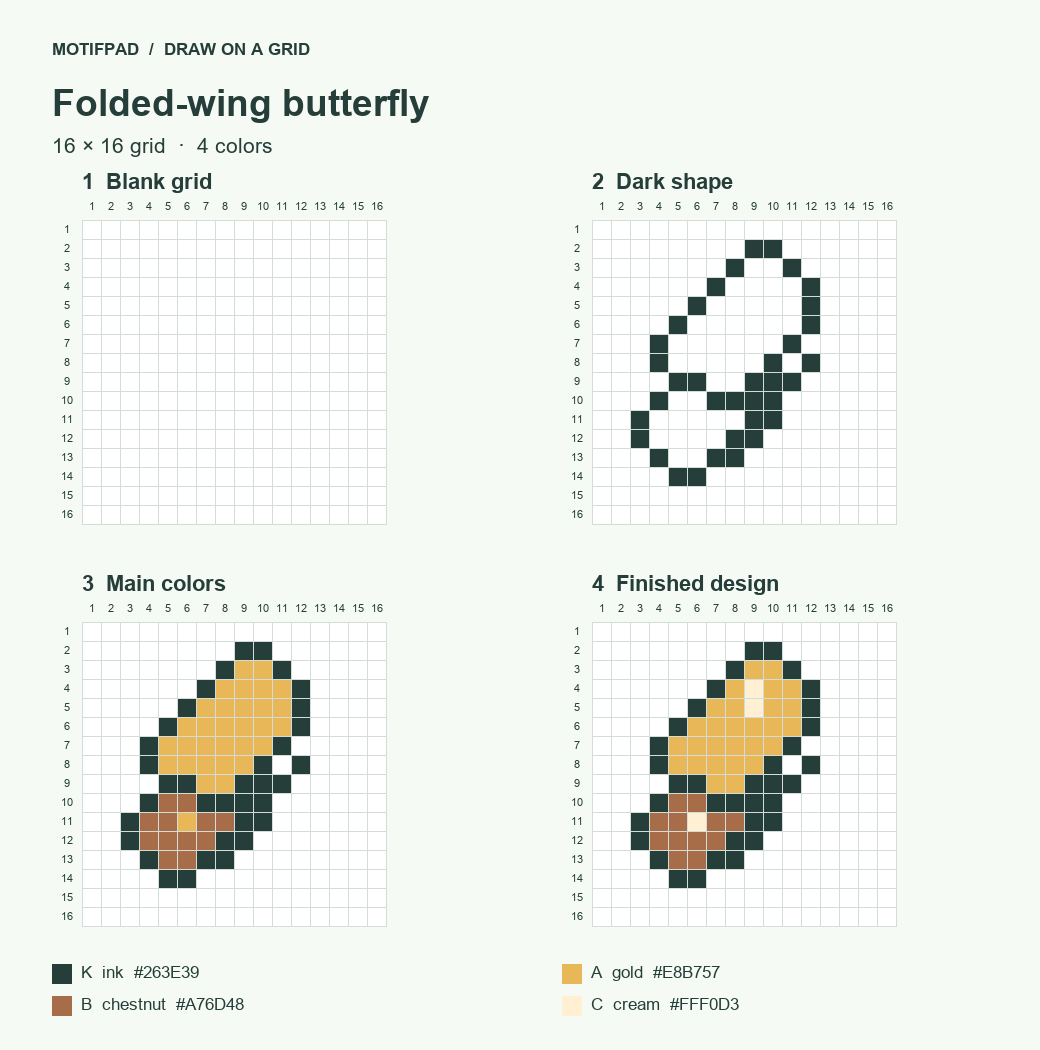
- Outline the tall visible wing, rising from the dark body at the lower right. Copy the short antenna above the body. Add the smaller lower lobe on the left without mirroring the entire drawing.
- Fill the tall wing gold and the lower lobe chestnut. Keep the dark diagonal body visible along the lower-right edge. The large blank area to the right belongs to the side-view composition.
- Add two cream cells along the upper wing and one inside the lower lobe. Keep the marks inside their colored sections. This three-quarter silhouette is intentionally different from the symmetrical front-facing designs.
Download a butterfly or practice its wing pattern
Get the complete charts and practice sheets. The ten-page PDF includes eight finished lettered wing charts and two pages with eight blank grids. Copy a dark silhouette first, then compare its proportions before adding the colors. Each chart keeps the palette and three placement steps on the same page.
| Design | Transparent PNG |
|---|---|
| Round-wing butterfly | Save round-wing butterfly PNG |
| Tall-wing butterfly | Save tall-wing butterfly PNG |
| Scalloped butterfly | Save scalloped butterfly PNG |
| Long-tail butterfly | Save long-tail butterfly PNG |
| Diamond-wing butterfly | Save diamond-wing butterfly PNG |
| Compact butterfly | Save compact butterfly PNG |
| Split-tip butterfly | Save split-tip butterfly PNG |
| Folded-wing butterfly | Save folded-wing butterfly PNG |
All PNGs have transparent backgrounds and measure 512 × 512 pixels. They are enlarged from the 16 × 16 drawings without softening the edges. Use nearest-neighbor resizing to return to the small source grid; use the PDF when you want visible cell labels.
Make the colors suit the wing shape
For colorful butterfly pixel art, give the upper and lower wings distinct fills while keeping their light marks brighter than both. Changing every dark cell to a pale shade can hide the body and antennae. Start by swapping only the two broad wing colors so you can still judge the silhouette.
A folded wing needs space in front of the body; a broad butterfly needs room on both sides. Place either beside a drawing from the flower grid guide without covering its antennae. To practice a face after working on symmetry, try the cat drawing collection.