Crochet / GUIDE
How to Tapestry Crochet: A Small Project From Start to Finish
Practice enclosing a second yarn, switching colors and turning a flat piece with a small offset-stripe layout. Check the fabric on both sides as you work.
The strand you are not using still has a job in tapestry crochet: it travels inside the stitches until its color is needed. Let it trail across the back and you are no longer practicing the enclosed carry described here. Pull it too tightly and it can draw the surrounding fabric together.
This guide explains how to tapestry crochet through an original offset-stripe practice plan. The carrying and color-change methods are source-backed; the 12-stitch layout has been checked digitally but has not been made into a physical sample.
Prepare a Small Tapestry Swatch
Choose two distinguishable shades with similar thickness, preferably from the same yarn range. Smooth yarn makes individual stitches easier to examine. Have a suitable hook, scissors, a yarn needle and a removable marker available. Hook choice needs a trial with your yarn; no tested hook size or finished measurement is claimed for this layout.
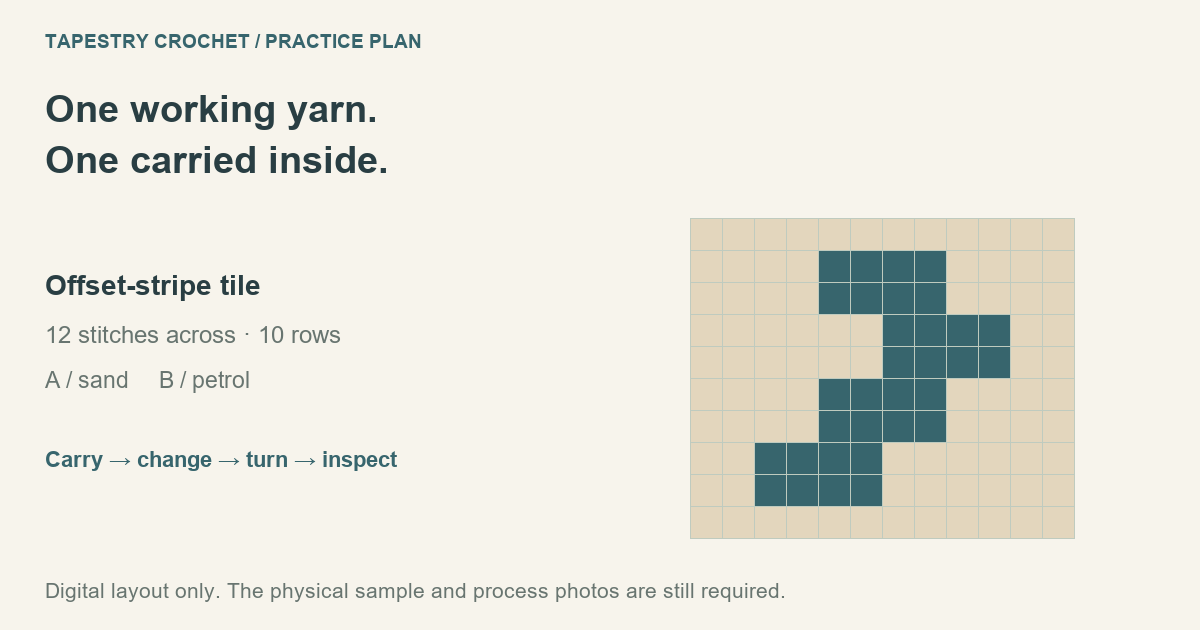
The practice tile uses A for sand and B for petrol. The four-stitch B band moves sideways every two rows, giving you repeated color changes without a third strand. Work flat in US single crochet through both top loops; this is a small technique sample, not a coaster or garment pattern.
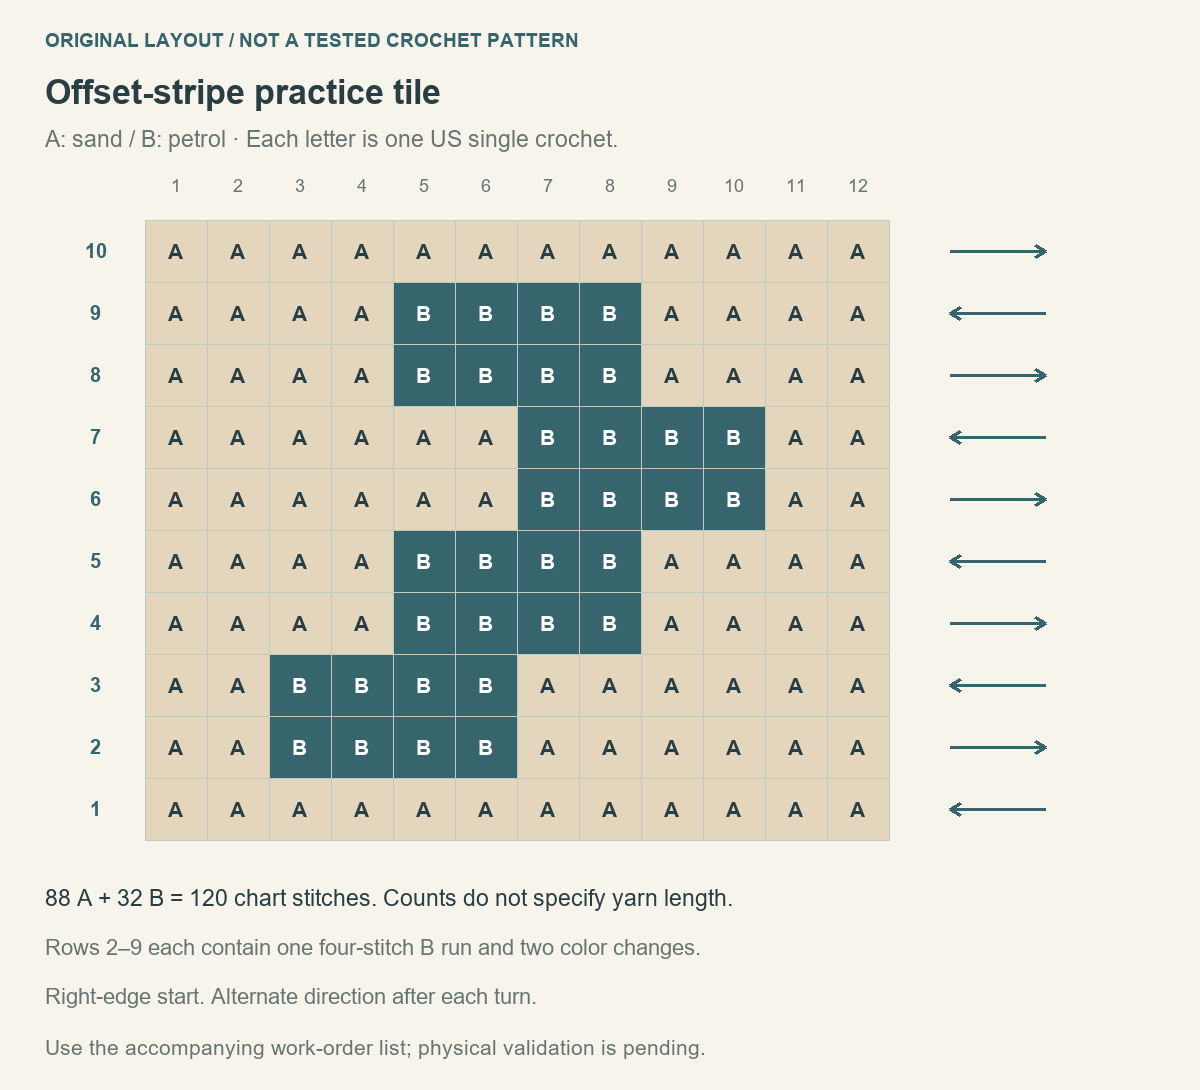
Digital practice layout: 12 stitches across and 10 rows. The drawing does not predict the fabric's proportions or show carried yarn.
Set up the first row
Chain 13 with A. Starting in the second chain from the hook, make 12 single crochets. This setup uses the Craft Yarn Council's single-crochet method. The first row contains A alone; introduce B at the beginning of row 2. A chain-one turn is not included in the twelve-stitch count.
Carry Yarn and Change Colors
How to do tapestry crochet with an enclosed strand
After turning for row 2, leave a tail of B for securing later and lay its working strand along the top of the previous row. Crochet the first two stitches with A around that strand. B needs to pass inside each stitch, rather than hang as a separate span behind them. Lilla Björn's photographed tutorial demonstrates this carry and explains why skipping it leaves floats.
Keep both yarn supplies free to feed. As B travels through the initial A section, watch where it exits near the next working position. That is the strand you will use for the upcoming change; the short starting tail is not the working yarn.
Make the change during the last stitch of the old color
Row 2 is worked as 2A, 4B, 6A. On the second A stitch, insert the hook and pull up a loop with A. With two loops remaining, use B for the final yarn-over and draw it through both loops. The next stitch is the first B stitch. This timing follows Crochet.com's color-change demonstration.
Now enclose A inside the four B stitches. On the fourth B stitch, use A for the final pull-through, then finish the row's six A stitches while carrying B. There are still twelve stitches: a change of working yarn is not an extra stitch.
Turn with the unused yarn on the intended side
Mark row 1's front as the right side. Row 2 is worked with the wrong side facing; row 3 returns to the right side. For the flat method shown by E'Claire Makery, keep the non-working strand toward you on wrong-side rows and away from you on right-side rows, then enclose it as you stitch. The source's photographs show the hand placement.
Every row here ends in A. Chain one with A, turn and reposition B for the first stitch of the next row. Continue carrying it through the remaining rows, including the all-A final row; do not leave an unworked length across the back simply because the next few cells are A.
Read the Rows and Check the Finished Fabric
The instructions below are already in working order for a right-edge start. Each number is a count of single crochets in the named color. Rows 2–10 begin with the chain-one turn described above.
| Row | Color sequence | Carry |
|---|---|---|
| 1 | 12A | A only |
| 2 | 2A · 4B · 6A | Enclose the unused strand |
| 3 | 6A · 4B · 2A | Enclose the unused strand |
| 4 | 4A · 4B · 4A | Enclose the unused strand |
| 5 | 4A · 4B · 4A | Enclose the unused strand |
| 6 | 6A · 4B · 2A | Enclose the unused strand |
| 7 | 2A · 4B · 6A | Enclose the unused strand |
| 8 | 4A · 4B · 4A | Enclose the unused strand |
| 9 | 4A · 4B · 4A | Enclose the unused strand |
| 10 | 12A | Enclose the unused strand |
Learning how to crochet tapestry involves inspecting the fabric while the problem is still close to the hook. Pause after row 3 to examine the first return row and after row 7 to inspect both sideways shifts.
- Visible long strands on the back: check whether the unused yarn escaped one or more stitches. Distinguish a float from the short tail that still needs weaving in.
- A gathered or narrowing section: examine the tension of the carried strand before tightening it again. Catherine Crochets explains that pulling the carry too firmly can pucker the fabric; concealing it should not draw the row inward.
- B showing through A: try a small tension or hook adjustment on a separate test section. Judge both coverage and flexibility; do not keep pulling B until the sample becomes distorted.
After completing row 10, fasten off and use the yarn needle to secure the ends without cinching the edge. Photograph both faces before and after finishing so loose tails are not mistaken for faults in the carry. Record any corrections before using the practice plan as a repeatable project.
The swatch workplan and observation sheet keeps the proposed rows with the checks to record. Use the sheet alongside this tapestry crochet tutorial to record how your yarn and tension affect the practice sample.
Once you have practiced managing the two strands, the crochet graph maker can help plan a different motif. Its chart cannot demonstrate your yarn handling or replace the sample you make with your own materials.