Beads / GUIDE
Kandi Keychain Ideas: Original Flat Charms With Charts
Compare three original flat charm layouts by bead count, follow their color keys, and see what still needs checking before adding keychain hardware.
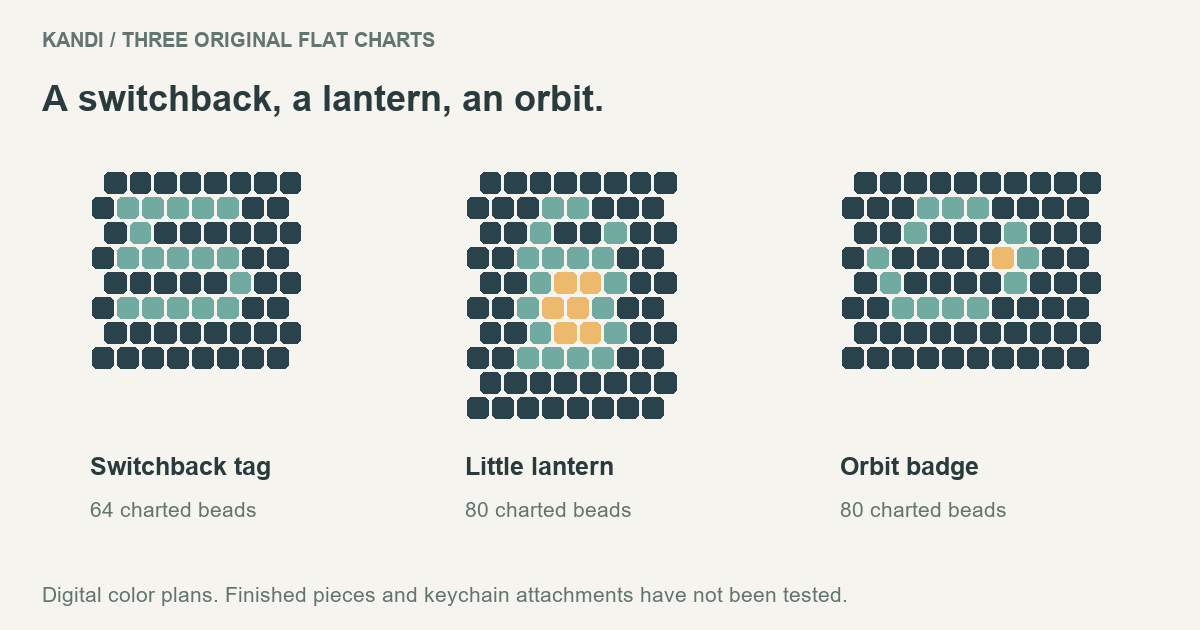
A small charm can use fewer colors than it first appears to need. The switchback below uses two; the lantern and orbit use three. These kandi keychain ideas keep the pictures inside complete bead panels, so the background belongs in the bead count instead of disappearing around the design.
The set contains original flat brick-stitch color plans. These designs, their thread routes and their keychain connections have not been physically tested. Use the charts to compare designs and plan a trial; they are not complete, tested keychain instructions.
Choose a Flat Charm Design
Start with the outline of the beadwork, not just the picture inside it. All positions are occupied in these three layouts, including the dark background. None requires a separate dangling shape. If you want two-color kandi charm ideas, the switchback has the smallest palette and the fewest beads in this set.
| Design | Chart size | Beads by color | Panel total |
|---|---|---|---|
| Switchback tag | 8 positions × 8 rows | A: 47, B: 17 | 64 |
| Little lantern | 8 positions × 10 rows | A: 56, B: 18, C: 6 | 80 |
| Orbit badge | 10 positions × 8 rows | A: 66, B: 13, C: 1 | 80 |
These totals describe the colored panel only. They exclude a connector, any extra beads used for a hanging loop, and spares. A position count also does not establish a size in inches: bead shape, dimensions and spacing determine how large the actual charm becomes.
Switchback tag
A lagoon-colored line changes direction twice against an ink background. Its long color runs make the design easier to track than scattered single-bead details. Keep the dark beads between the bends: removing them would change the panel into a shaped strip and require a different construction plan.
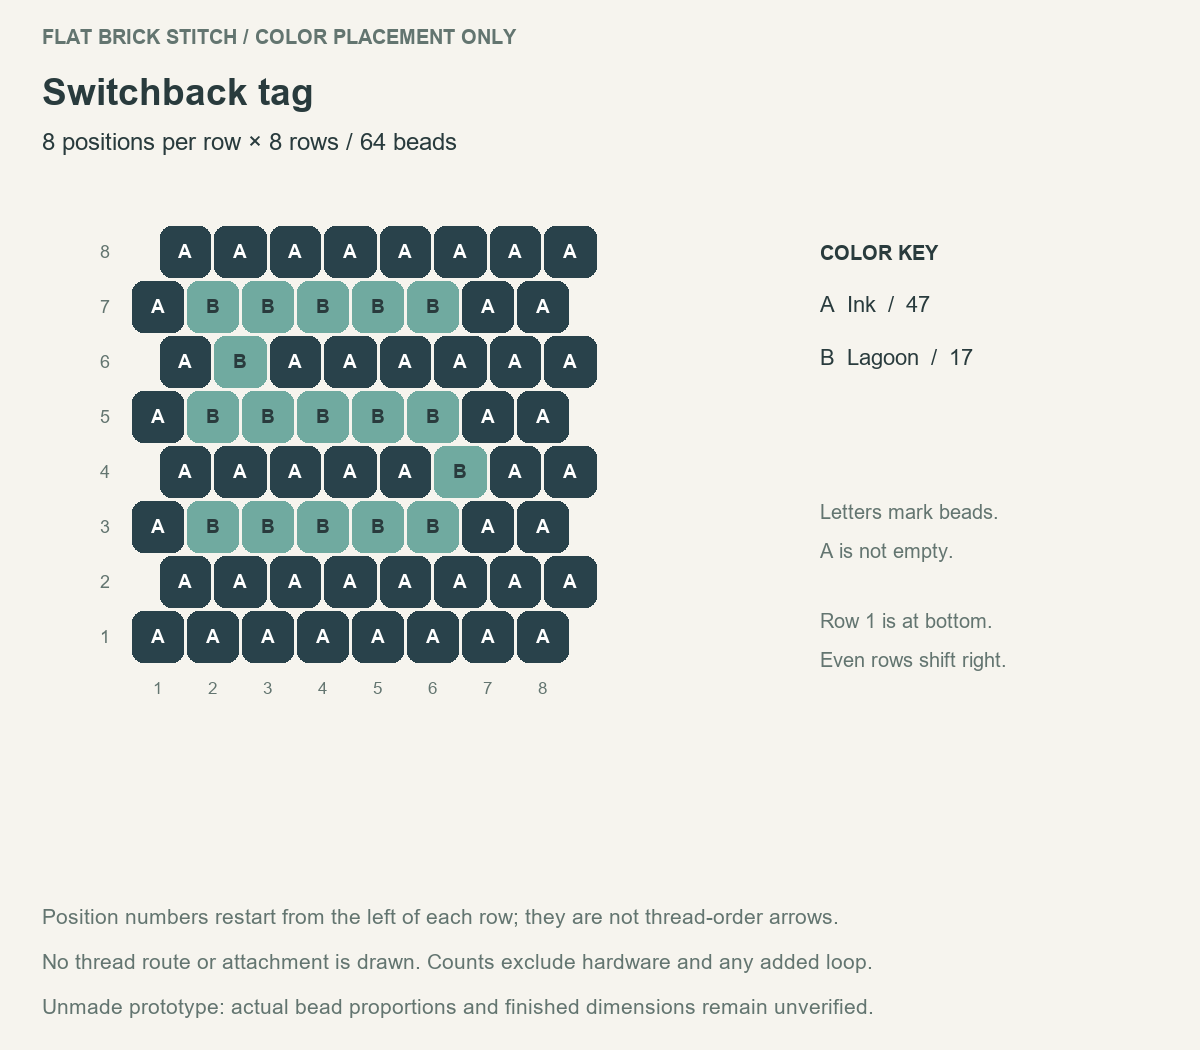
Switchback tag: 64 charted beads. The illustration represents color placement, not a photograph of finished beadwork.
Little lantern
An amber window sits inside a lagoon frame, with a small handle drawn above it. The handle is a color motif within the panel, not an exposed hanging loop. The six amber beads form the light; they do not specify transparent or glow-in-the-dark material.
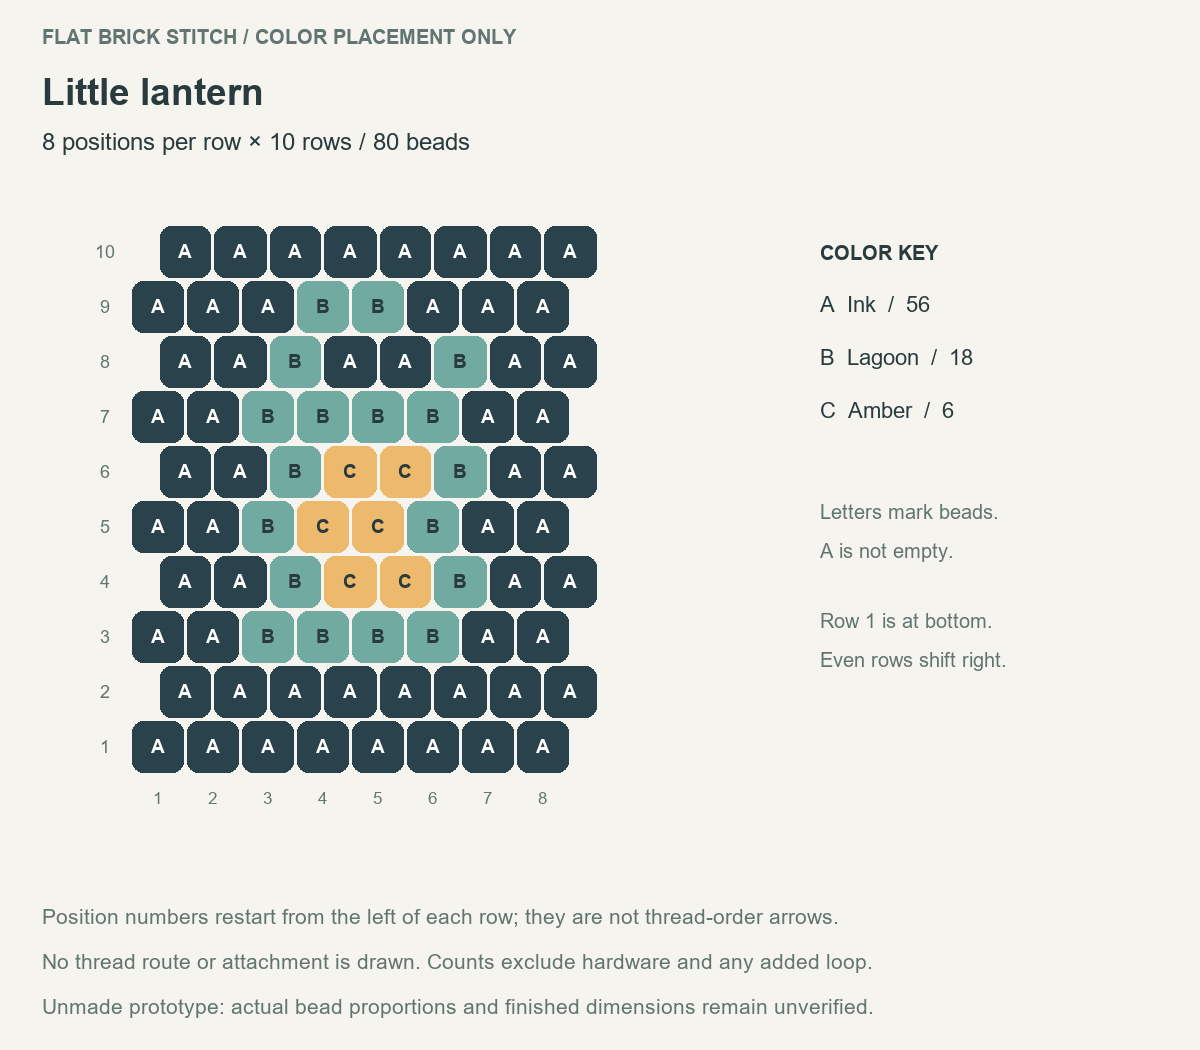
Little lantern: 80 charted beads. The illustration represents color placement, not a photograph of finished beadwork.
Orbit badge
An offset lagoon ring surrounds an ink center, with one amber bead interrupting the right-hand side. That single accent offers a useful orientation check: a mirrored copy moves it to the other side. The center is filled with background beads, not a hole.
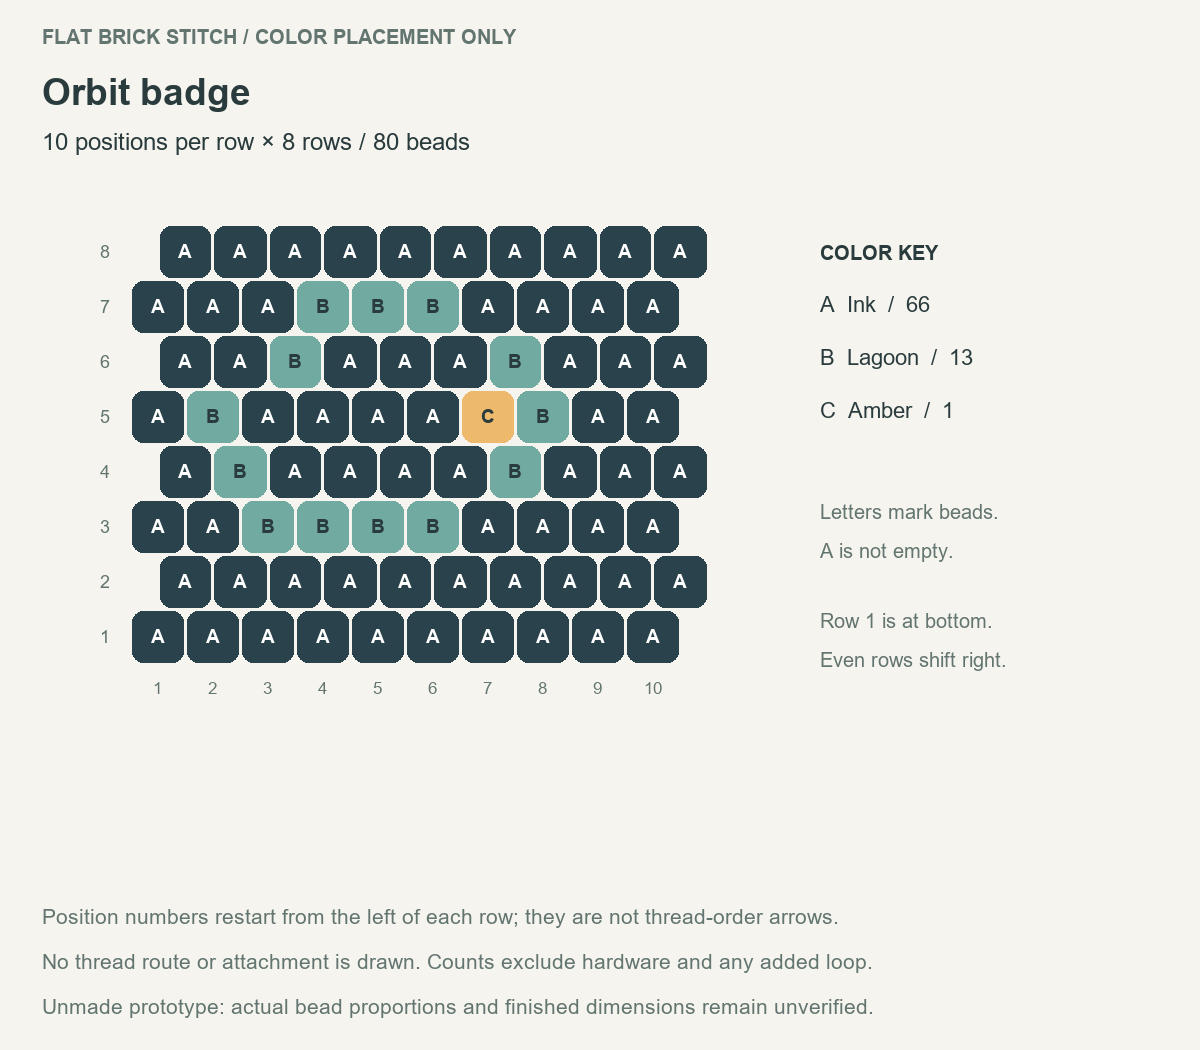
Orbit badge: 80 charted beads. The illustration represents color placement, not a photograph of finished beadwork.
Read the Bead Chart and Color Key
A = ink, B = lagoon, C = amber. The letters distinguish colors even when a printout makes the shades hard to separate. They are palette labels, not a bead brand or a promise of an exact retail color match. Choose the actual colors together so the motif remains visible against A.
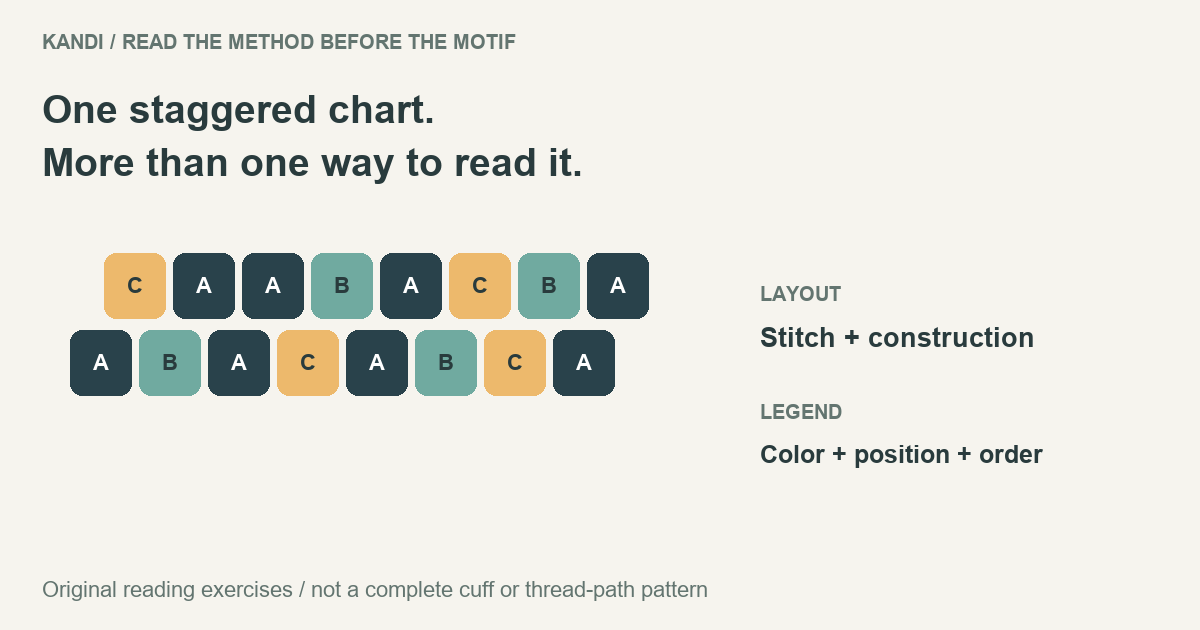
The left-hand labels number rows from the bottom upward. Count positions from the left edge of the particular row you are checking; even-numbered rows sit half a bead farther right. For the lantern, row 5 reads A A B C C B A A in this fixed front view: four A, two B and two C beads. That is a location check, not an instruction to thread every row left to right.
A brick-stitch panel needs a construction method as well as a color map. Fire Mountain Gems' ladder-stitch lesson explains a common foundation. Beadaholique's brick-stitch demonstration then shows how beads connect to thread bridges and why edge turns need attention. Those references explain the technique; they do not verify these new motifs.
For an altered palette or another panel design, the flat kandi pattern maker uses the same alternating row offset. It can record the colors and totals. It does not calculate how to secure a row end, route the thread around an erased bead, or attach a key ring.
Download the three color records and prototype worksheet. Each row in that file is listed left to right as viewed from the front, with the same numbering as these charts.
Finish the Charm as a Keychain
A keychain needs a secure connection between the woven panel and the hardware. A colored handle or border cannot supply that connection by itself. Before selecting a split ring, connector or loop, make the panel with your chosen beads and record the actual top-edge structure.
A completed brick-stitch keychain by Julia at Beading for the Very Beginners documents ring attachment and securing the line ends on her own project. It is a reference for the finishing stage, not a tested attachment recipe for the three designs here.
- Resolve the edge route: document how the first and last beads of each row are secured. Matching the bead count alone does not confirm the weaving method.
- Specify the connection: record which beads or added loop support it, the hardware used, and the reinforcing passes. Check that fitting the hardware does not distort the panel or damage the thread.
- Record the finished result: photograph the front, back and attachment close-up; measure the panel separately from its hardware. Recheck the color totals after any changes.
The charts provide color-placement ideas; they do not establish durability for everyday keychain use. Cuffs and three-dimensional stars require their own construction; they are outside this flat-panel set.