Beads / GUIDE
Perler Bead Coasters: Patterns and Finished Examples
Compare two original coaster grids with documented finished projects. Check the footprint, choose the right board and understand what a backing can—and cannot—prove.
A coaster pattern has two outlines to consider: the visible design and the base of the glass it needs to support. A round fruit motif may look generous on screen yet leave a wider cup resting over its edge. These Perler bead coasters start with that fit question, then connect the drawing to the board, backing and finished measurements.
The two downloadable designs below are original, unfused digital prototypes. Their bead counts are checked, but they have not been physically made or measured. Finished examples are linked to their makers separately; those projects do not establish how our prototypes will perform.
Choose a Coaster Pattern
Perler bead patterns: coasters to prototype
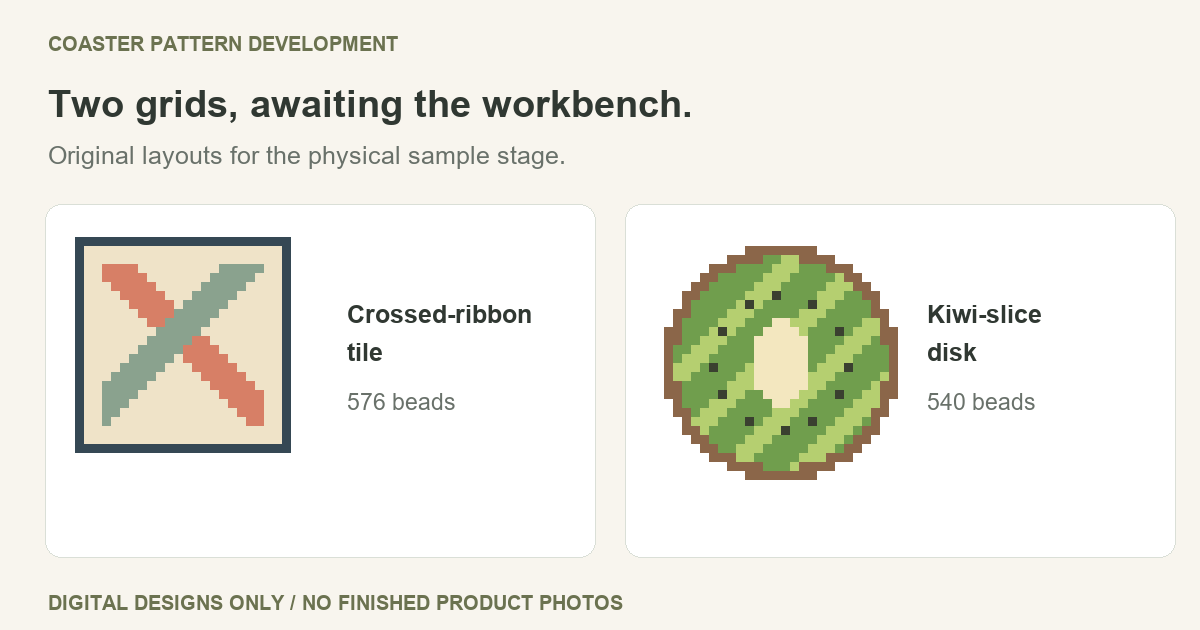
Choose the crossed-ribbon tile for a filled square, or the kiwi slice for a stepped round outline. Both use a square peg arrangement. The kiwi's circular silhouette does not make it a pattern for a circular pegboard.
| Original layout | Chart | Beads | Design detail |
|---|---|---|---|
| Crossed-ribbon tile | 24 × 24 | 576 / 4 colors | Filled square with a one-cell navy border |
| Kiwi-slice disk | 28 × 28 | 540 / 5 colors | Round body inside an empty square margin |
A geometric tile with crossing bands
The coral and sage bands meet off center, leaving a cream field between the diagonals and the navy rim. Every chart cell takes a bead. Keep the outside row and column intact when changing the colors; removing part of that border changes the footprint as well as the drawing.
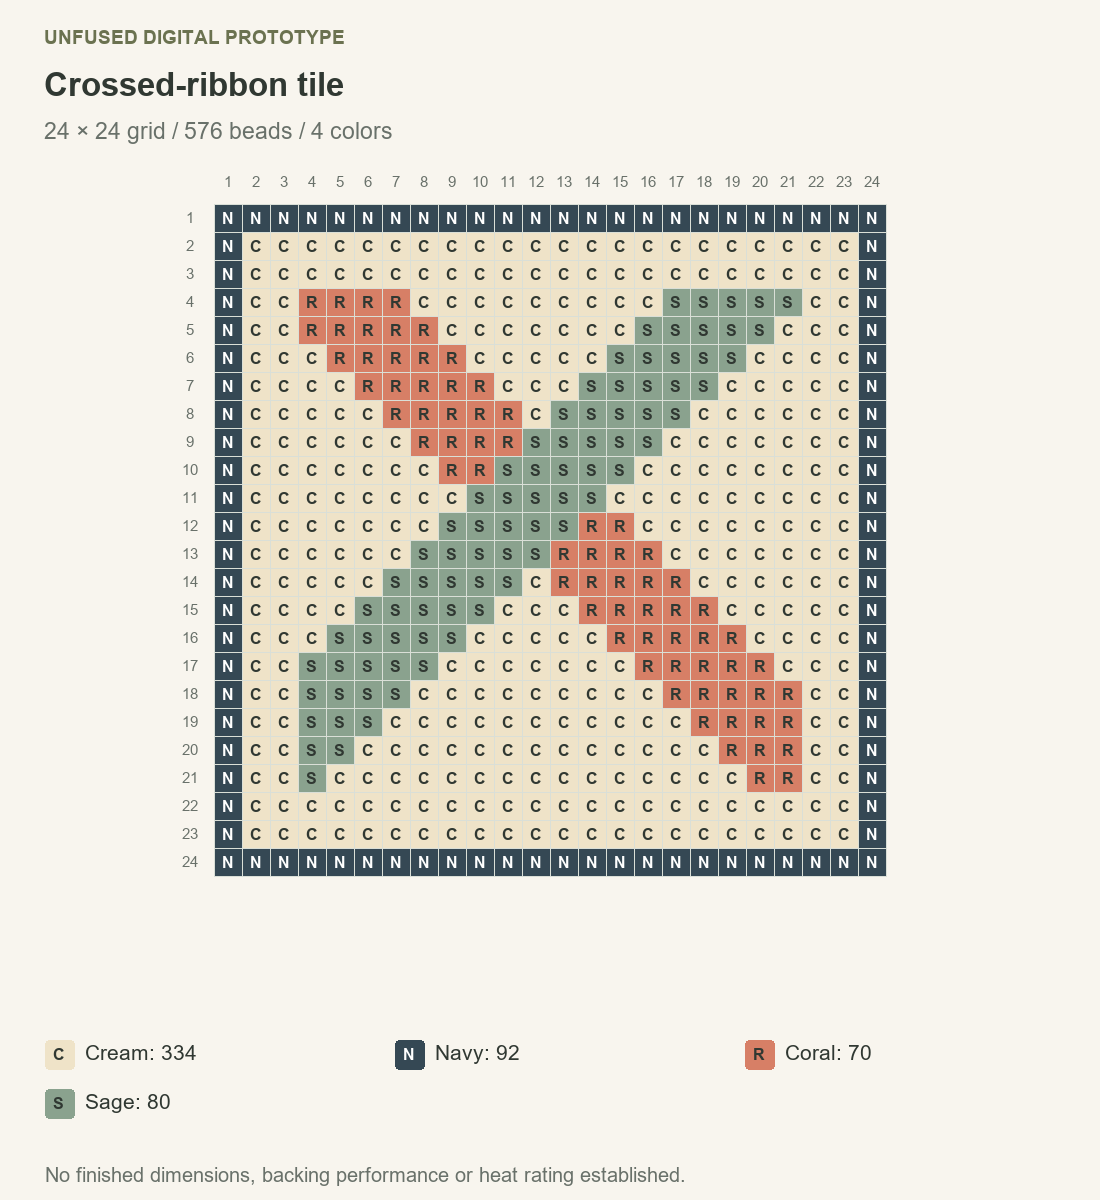
Crossed-ribbon prototype: cream 334, navy 92, coral 70 and sage 80. The colors describe this drawing, not Perler product codes.
A fruit coaster pattern on a square grid
The kiwi uses a brown outer ring, two greens, a cream center and twelve dark seed cells. Its occupied shape spans 26 positions across the middle of a 28-column chart. The remaining margin and corner cells stay empty; filling them would turn the disk into a square.
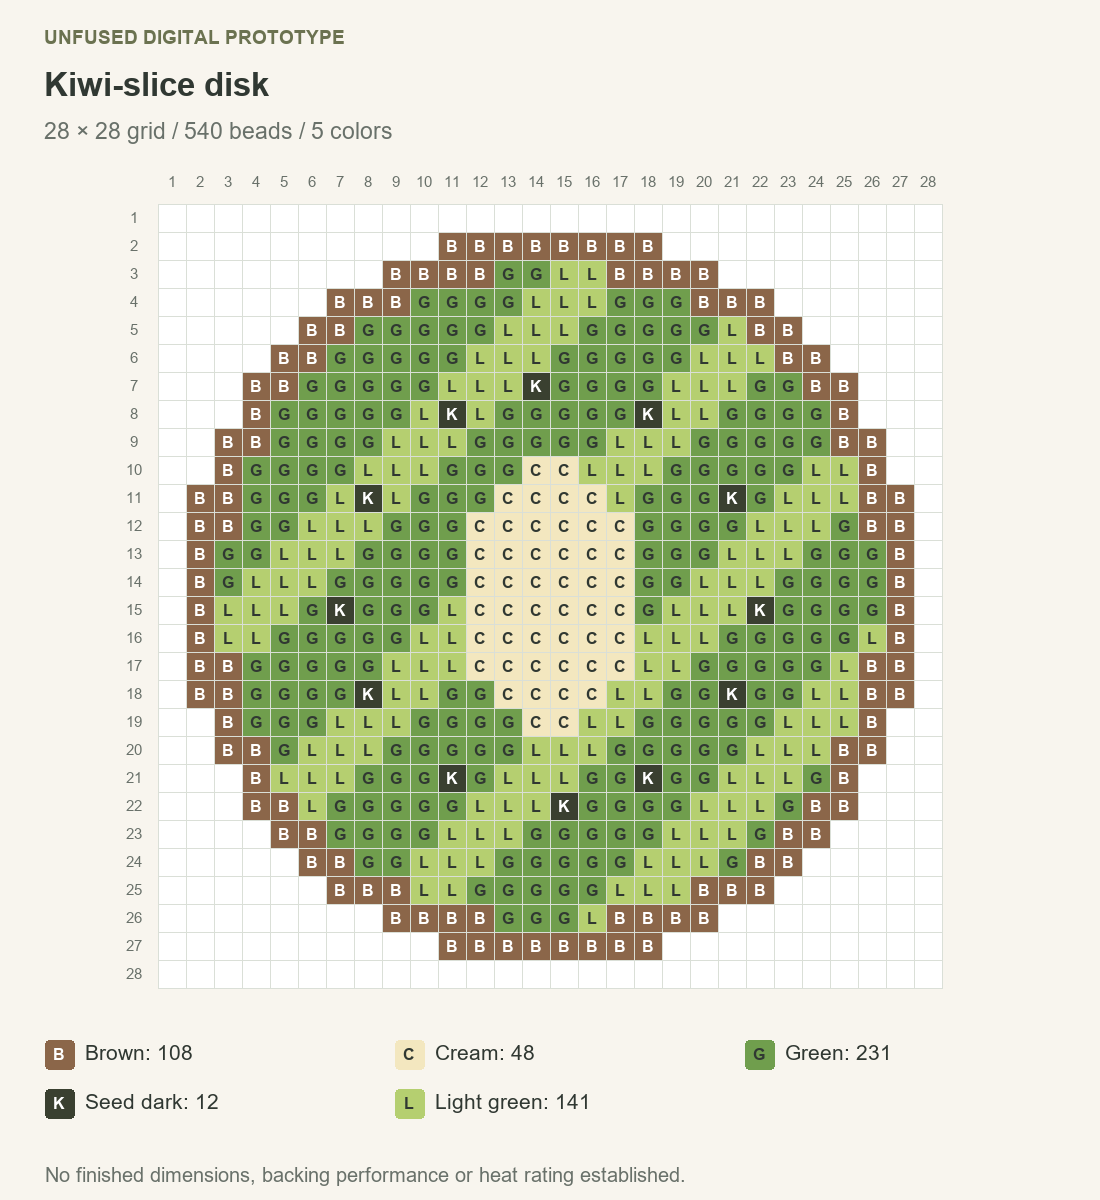
Kiwi prototype: brown 108, cream 48, green 231, dark seeds 12 and light green 141. Blank cells are excluded from the 540-bead total.
Finished examples to inspect at the source
These published projects show how other makers have assembled actual coasters. Open the source pages for their finished photographs and full instructions.
- Round flowers: Perler's Flower Coaster Set uses large circle pegboards and cork cut to match each coaster. This is a different board layout from either printable above.
- Small-bead squares: Perler's Mini Beads Lemon-Lime Coasters uses mini beads, a matching mini pegboard and a thin cork underside. Its bead size should not be silently substituted into a standard-bead project.
- A larger round example: Amy at DIY Candy reports an approximately 5.45-inch diameter for the Boho Flair coasters in her photographed coaster collection. That is about 13.8 cm by conversion, not a measurement of either design in this article.
Match the Grid to the Finished Size
For coasters, Perler beads need to form a footprint that suits the intended vessel. Measure the bottom that touches the table, not the wider rim of the cup. Compare that base with the usable central area of the design; a projecting petal or corner does not support the whole base.
A chart's row count is not a finished measurement. Board spacing, bead size and the fused result all matter. For a layout estimate, measure across the first and last occupied pegs, then allow for the bead extending beyond those peg centers. Label that figure as an estimate until the cooled piece can be measured.
On the ribbon tile, the occupied width is 24 positions. On the kiwi, it is 26 at the widest part, even though the canvas is 28 columns wide. This distinction prevents the empty border from inflating a size estimate.
After making a sample, record its actual width and height, plus its total thickness after backing. Check it on a level surface and compare it with an empty, room-temperature vessel. Rocking or an overhanging base calls for a change before use; a stable fit alone says nothing about heat resistance or moisture protection.
Print the Pattern and Finish the Coaster
Download the printable Perler bead coaster patterns — three-page PDF. Page 2 contains the ribbon tile; page 3 contains the kiwi. The enlarged, lettered charts are counting references, not life-size templates to place underneath a pegboard. They can be printed on US Letter or fitted within A4 margins.
- Match materials to the chart. Use a square pegboard compatible with your chosen bead size. Follow the numbered rows and leave unlettered cells empty.
- Fuse using the manufacturer's method. Perler's Flower Coaster Set instructions assign fusing to an adult, using ironing paper on a flat, heat-safe surface. They call for the design to cool before turning it over and fusing the other side. Follow the linked project and your product instructions rather than treating our digital grid as an ironing test.
- Choose and document the underside. The flower project glues matching cork circles underneath; the mini-bead project specifies thin cork squares attached with hot glue by an adult. These are documented examples, not a verified backing specification for our two prototypes. Check the adhesive's material compatibility and curing directions.
Use limits: no heat rating, waterproofing or protection of a particular furniture finish has been established for the downloadable designs. Adding cork does not establish those properties. Do not treat them as trivets or claim that they are safe for hot cookware; photographs and bead counts cannot answer that question.
To try a different center motif while retaining a coaster-sized outline, use the Perler bead pattern maker. Inspect the resulting edge and occupied area before making a sample: a recognizable image and a usable coaster are separate requirements.