Beads / GUIDE
Animal Perler Bead Patterns: 6 Cute Designs With Bead Counts
Make room for six cute animal perler bead patterns on a square pegboard. Get numbered charts, color-by-color bead counts and a free seven-page printable PDF.
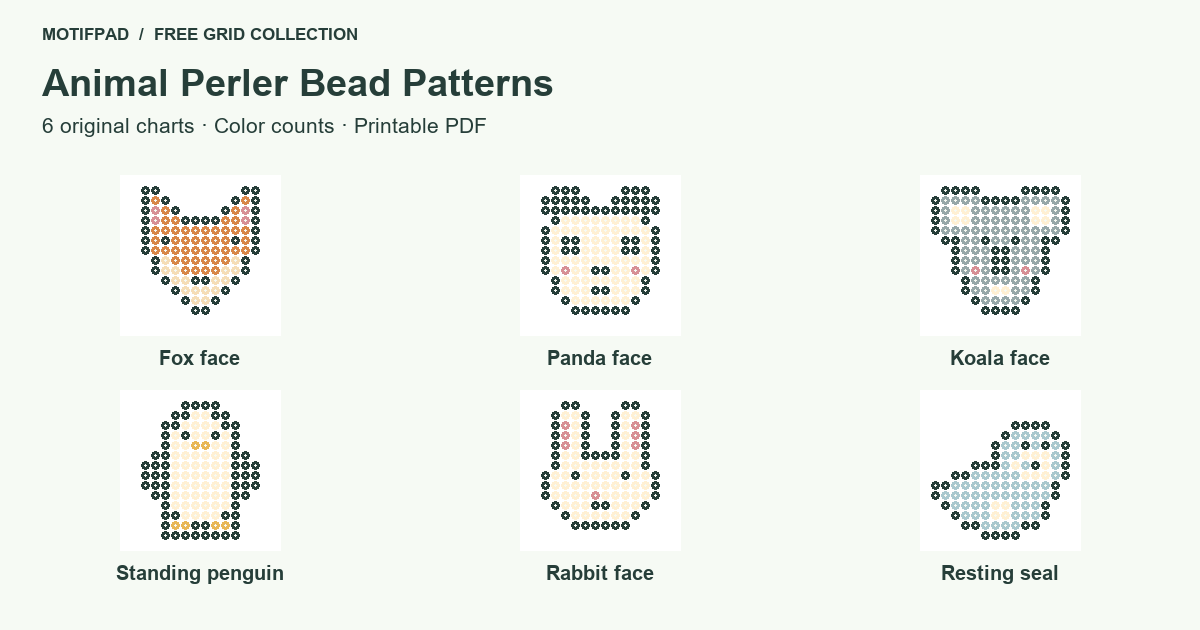
These animal perler bead patterns give you six compact designs to copy onto a square pegboard: a fox, panda, koala, penguin, rabbit and seal. Each comes with a color placement image, a numbered letter chart and exact bead counts. Download the seven-page PDF to keep the charts and combined color list beside your board.
Choose your first animal
Start with the penguin or seal if you want easy animal perler bead patterns with only three colors. The fox and koala use four. The table counts every occupied cell once, including the outline, eyes and nose; empty background cells do not count as beads.
| Animal | Grid | Colors | Beads | Distinctive detail |
|---|---|---|---|---|
| Fox face | 16 × 16 | 4 | 106 | Pointed ears and a white cheek wedge |
| Panda face | 16 × 16 | 3 | 132 | Dark eye patches inside a pale face |
| Koala face | 16 × 16 | 4 | 132 | Wide round ears and a tall nose |
| Standing penguin | 16 × 16 | 3 | 122 | A pale belly between two short flippers |
| Rabbit face | 16 × 16 | 3 | 116 | Long upright ears with a narrow gap |
| Resting seal | 16 × 16 | 3 | 107 | A lifted head and a low resting body |
Set up a square pegboard
These small animal perler bead patterns fit within 16 peg columns and 16 peg rows. Use one bead size throughout and a square pegboard made for that size. Count from the top left of each chart, placing one bead on each lettered square and leaving every blank square empty.
The round-bead images show color placement; they are diagrams, not photographs of finished pieces. Use the matching letter charts when two pale colors look similar. HEX values describe the artwork, not Perler product numbers, so choose the closest colors from your own bead supply. The charts are reading references, not life-size pegboard overlays.
Six animal charts with color counts
1. Fox face
16 × 16 pegs · 4 colors · 106 beads. K = ink (#263E39); 40 beads; A = orange (#D88647); 46 beads; B = cream (#F5DDB6); 16 beads; C = rose (#D78F95); 4 beads.
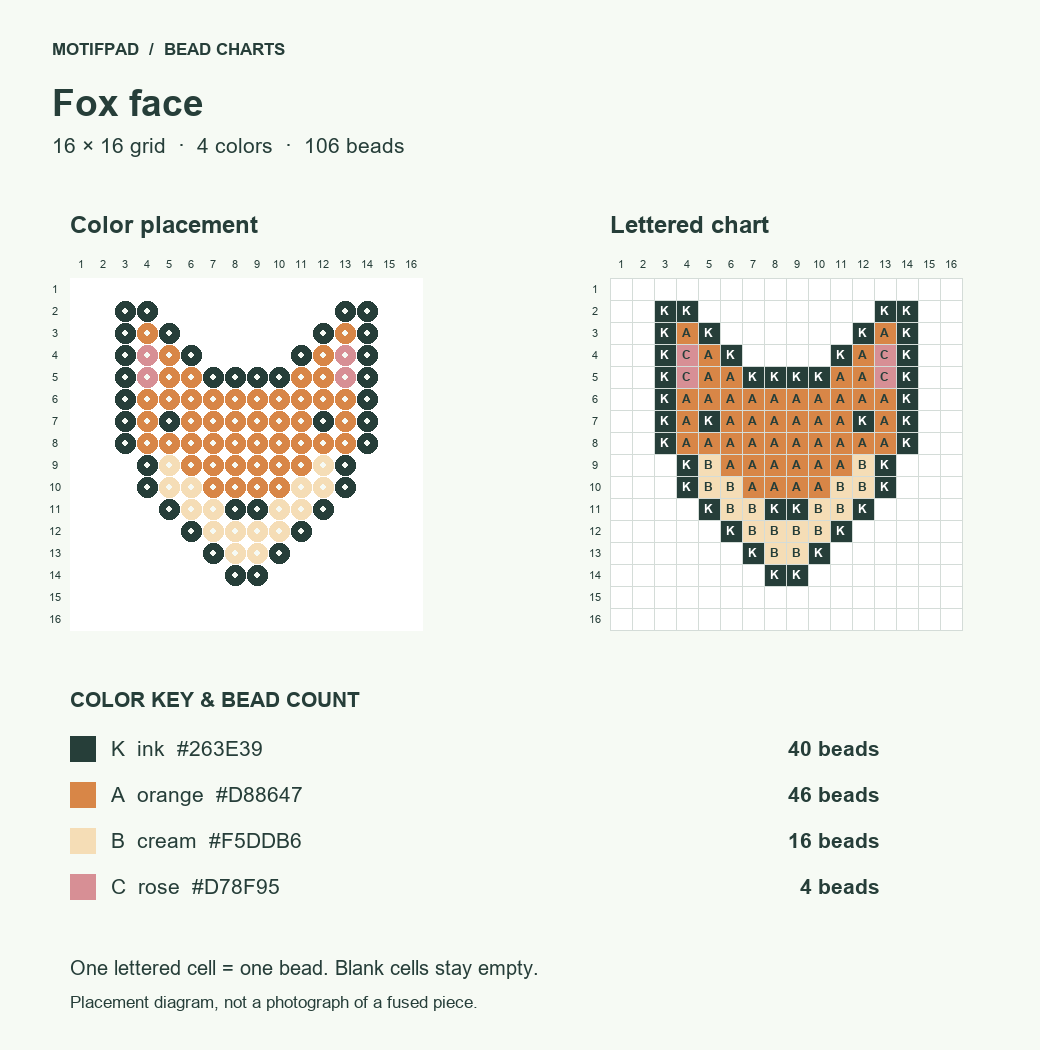
- Begin with the two ear tips on row 2, then connect them through the forehead on row 5. Place the dark cheek borders and the two-cell nose. Follow the taper one row at a time so the bottom ends in a narrow point.
- Fill the outer face with orange. Work the cream cheek wedges inward from each side toward the nose. Use the letter chart to keep the cream area separate from the orange center.
- Add the rose inner-ear beads last. Check both ears against their numbered columns before lifting the board. Every occupied square represents one bead; leave all unlettered squares empty.
2. Panda face
16 × 16 pegs · 3 colors · 132 beads. K = ink (#263E39); 64 beads; A = ivory (#FFF0D3); 66 beads; C = rose (#D78F95); 2 beads.
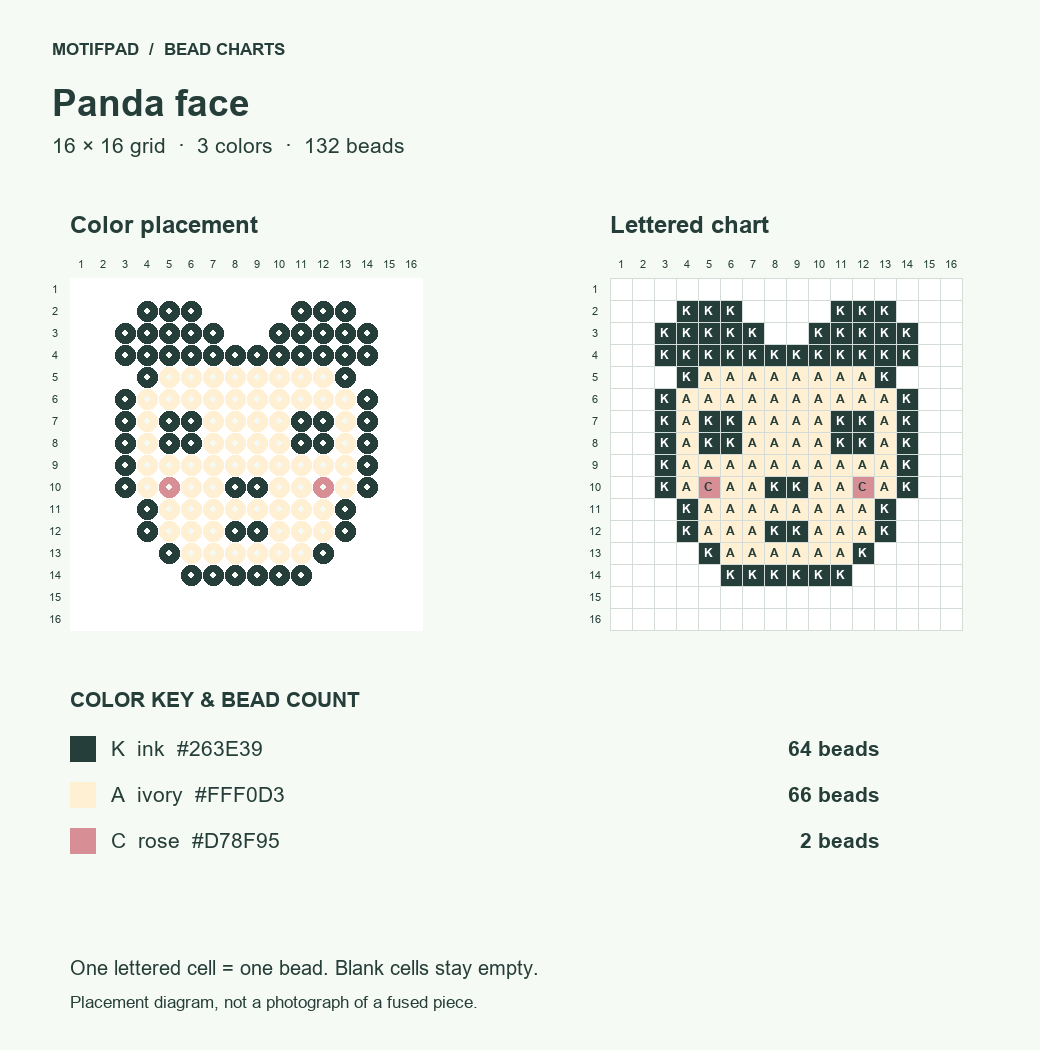
- Place the two dark ear blocks at the top and join them across row 4. Continue the face border down both sides. Build the two eye patches as matching two-by-two blocks, leaving the pale forehead between them.
- Fill the enclosed face with ivory while keeping the nose and mouth dark. Do not put ivory inside the ear blocks. The chart letters distinguish an ivory bead from an empty peg outside the face.
- Set the two rose cheek beads into the marked cells on row 10. Compare the left and right sides, then count each color against the list below the chart before fusing.
3. Koala face
16 × 16 pegs · 4 colors · 132 beads. K = ink (#263E39); 48 beads; A = gray (#96A7A8); 72 beads; B = ivory (#FFF0D3); 10 beads; C = rose (#D78F95); 2 beads.
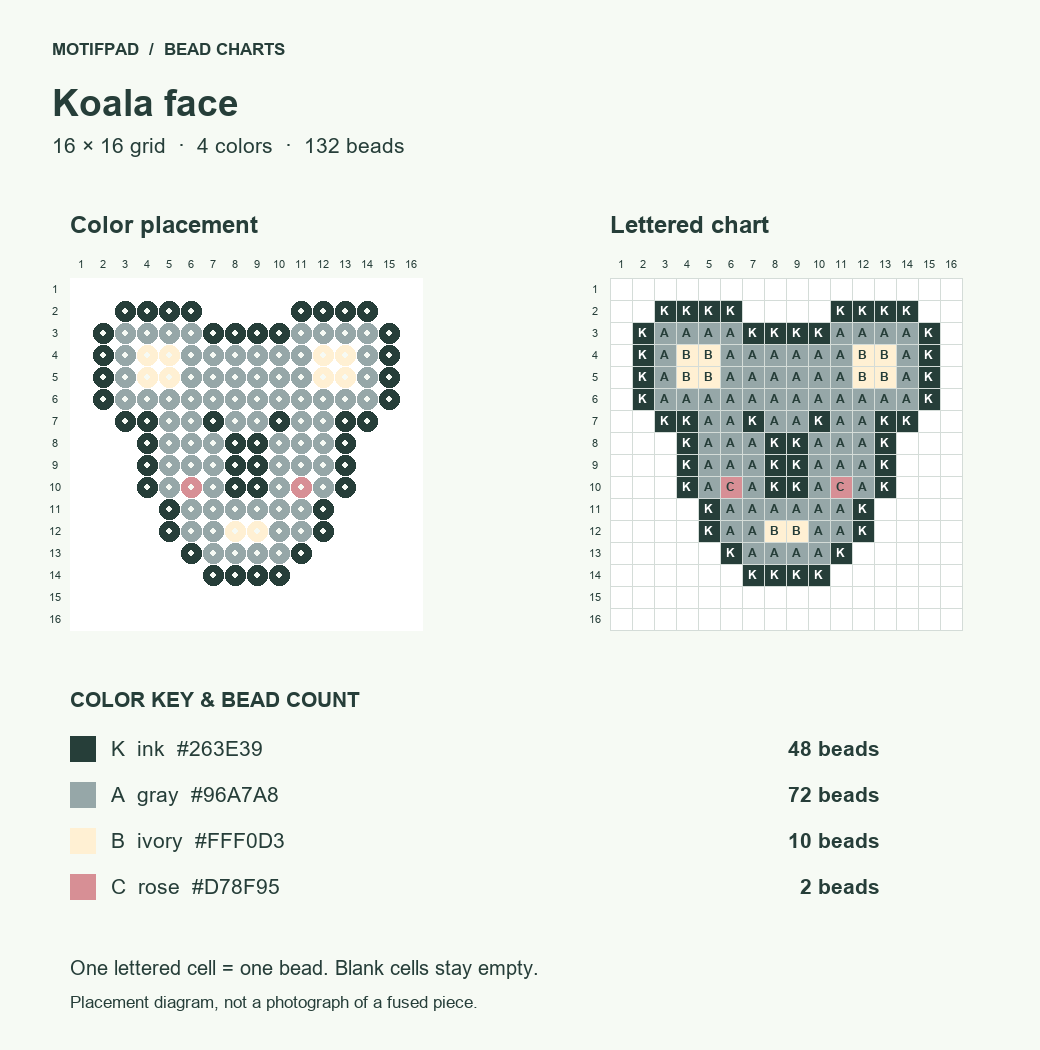
- Outline the wide ears first, then follow the narrower cheeks into the chin. Copy the eyes on row 7. Stack the dark nose cells through the center so the nose stays taller than the one in the panda pattern.
- Use gray for the head and outer ears. Add the ivory ear centers and the small ivory patch near the chin. The ear centers sit inside the gray border, with no empty pegs between those colors.
- Place one rose cheek bead on each side of the nose. Recheck the inward steps below the ears; those changes in width keep the head from becoming a plain rectangle.
4. Standing penguin
16 × 16 pegs · 3 colors · 122 beads. K = ink (#263E39); 62 beads; A = ivory (#FFF0D3); 54 beads; C = gold (#E8B757); 6 beads.
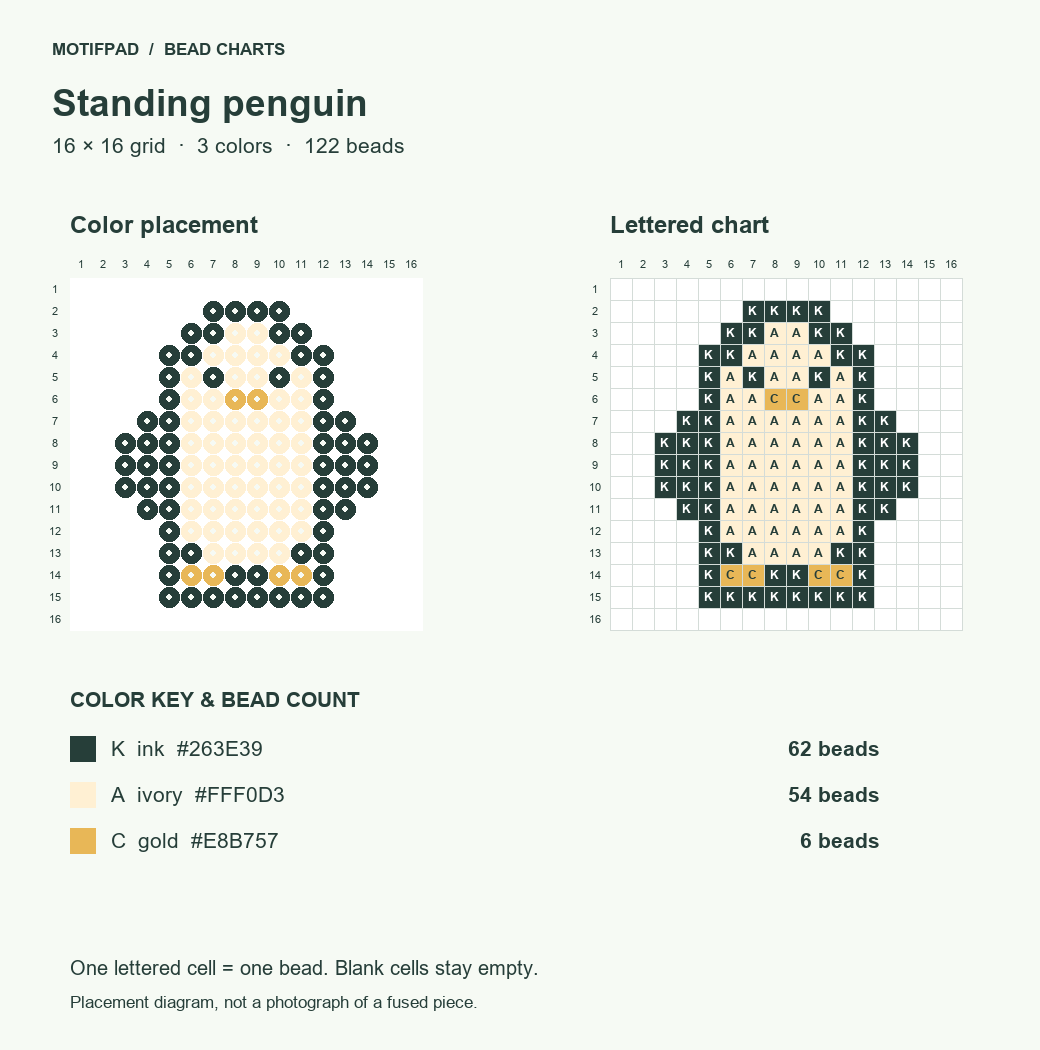
- Build the rounded head from row 2 and widen the dark outline at the shoulders. Follow both flippers down to their tips. Keep the outline around the feet so the two gold groups remain attached to the body.
- Fill the face and belly with ivory, leaving the eyes dark. Read the outer blank cells carefully around the flippers. They mark the silhouette and do not need beads.
- Add gold to the two-cell beak and the two feet. Count these small groups separately before comparing their total with the palette. This pattern uses three colors throughout.
5. Rabbit face
16 × 16 pegs · 3 colors · 116 beads. K = ink (#263E39); 48 beads; A = ivory (#FFF0D3); 61 beads; C = rose (#D78F95); 7 beads.
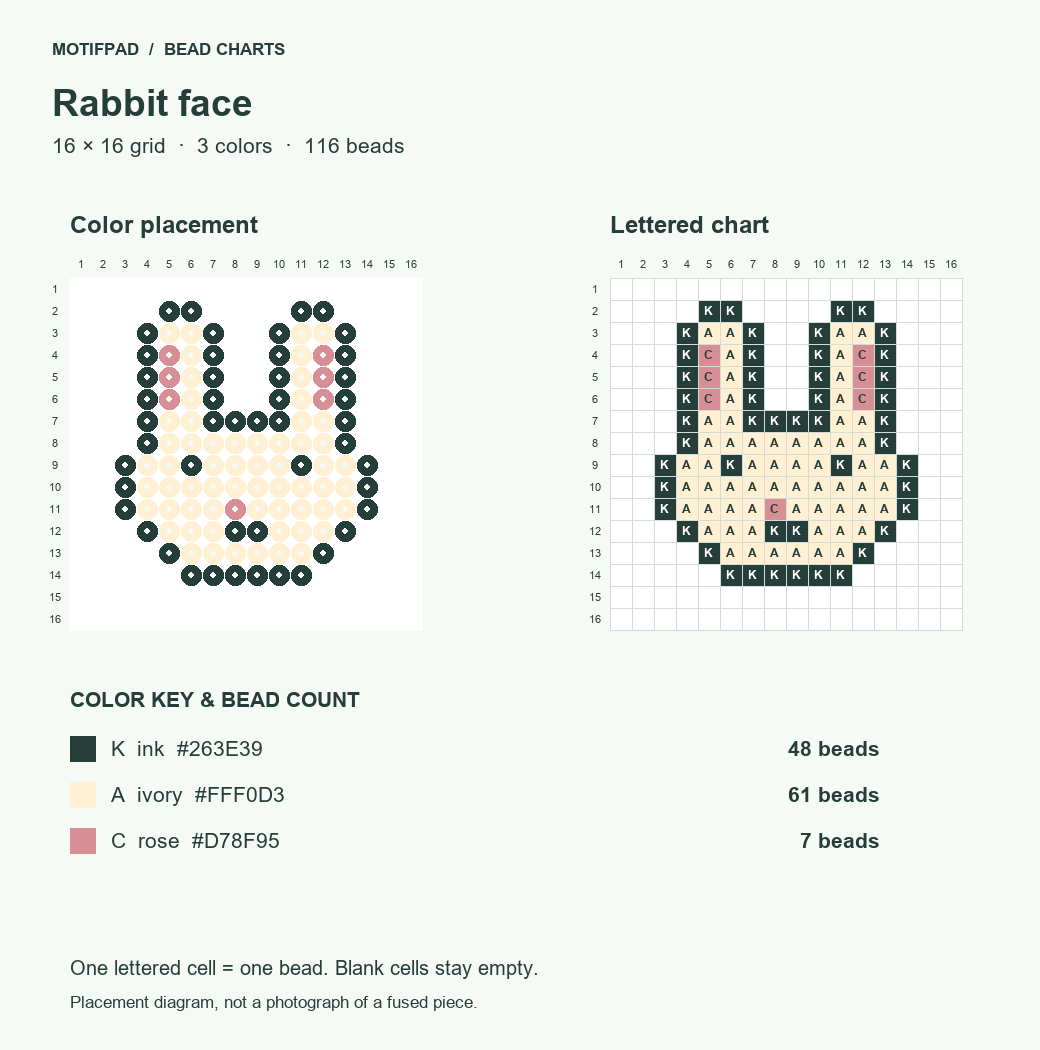
- Place the two tall ears, starting at row 2. Leave the space between them empty until the forehead joins on row 7. Continue around the wider cheeks and narrower chin, then add the dark eyes and mouth.
- Fill the face and the unmarked ear cells with ivory. Keep the dark borders intact along the inner edges of both ears. That separation makes the long ears readable even without a background.
- Add the rose ear strips and the single rose nose bead. The nose is a one-bead detail, so check its column in the letter chart instead of centering it by eye.
6. Resting seal
16 × 16 pegs · 3 colors · 107 beads. K = ink (#263E39); 37 beads; A = blue gray (#A9C8CE); 58 beads; C = ivory (#FFF0D3); 12 beads.
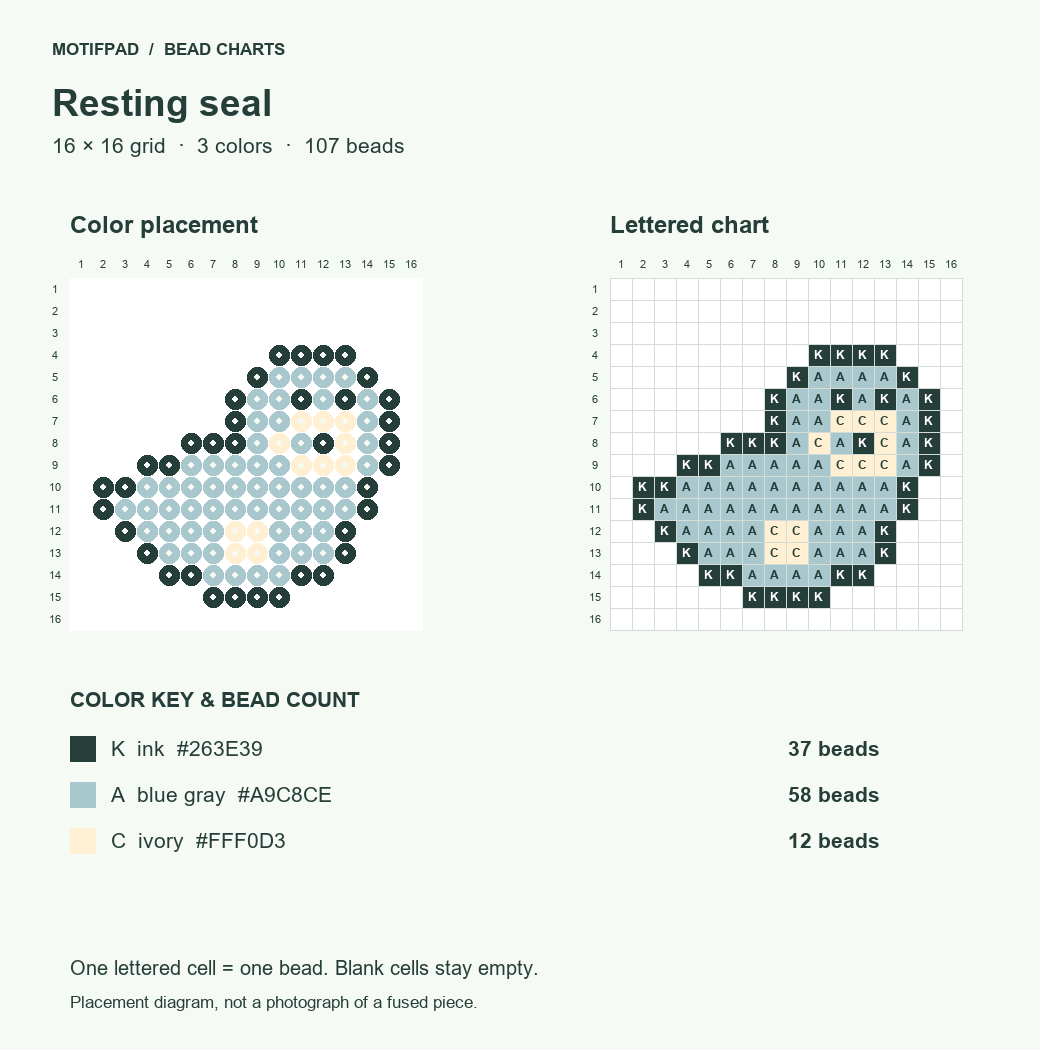
- Outline the raised head on the right, then extend the back toward the left. Curve the bottom edge underneath the body. Keep the left end narrow rather than adding a detached tail bead.
- Fill the body with blue gray, working around the dark eyes and nose. Place the ivory muzzle cells close to the nose. The letter chart shows which pale cells belong to the muzzle and which belong to the lower flipper.
- Finish the ivory flipper patch near the bottom. Check the complete bead total before fusing, especially around the stepped underside where one extra bead can change the resting shape.
Printable animal perler bead patterns
Download all six animal charts and the bead list. The seven-page PDF gives each animal its own numbered chart, color key, bead counts and placement steps. The last page combines the colors needed to make one of every design. Print at 100% for clear letters; count pegs from the chart instead of laying your board over the paper.
| Color in these charts | Beads for all six |
|---|---|
| blue gray (#A9C8CE) | 58 |
| cream (#F5DDB6) | 16 |
| gold (#E8B757) | 6 |
| gray (#96A7A8) | 72 |
| ink (#263E39) | 299 |
| ivory (#FFF0D3) | 203 |
| orange (#D88647) | 46 |
| rose (#D78F95) | 15 |
| Total | 715 |
This list counts the chart cells exactly, with no spare-bead allowance. If you substitute the same real bead color for two listed shades, add their quantities together. Keep a few spare beads nearby for dropped pieces, separate from the pattern totals.
Check the placement before fusing
Compare the ears, eyes and nose against the letter chart, then count the occupied cells in any row that looks uneven. Check the narrow joins around the ears and flippers carefully. If a bead has shifted away from its neighbors, return it to its lettered cell before starting the fusing steps.
Have an adult handle the iron and follow Perler’s standard fusing instructions for the beads and pegboard you use. Keep the numbered chart facing the same way as your board while checking placement. If a result will be viewed from its opposite side, the asymmetrical seal will face the other direction.
For a smaller project after these animals, choose one of the small bead patterns with printable charts. To turn your own animal image into a new chart, use the Perler bead pattern maker and inspect the eyes and thin connections before building it.